Friday, October 31, 2008

Closed: English AdSense Help Forum in Google Groups

Google Can't post to Adsense Help Discussions?

"Welcome to the AdSense Help Forum Archive!

Please note that this forum is only an archive and you can no longer post questions here."

Don't worry, the AdSense Help Forum was moved to a new platform that offers a number of features:

* Question & answer (Q&A) format to help you find answers quickly
* Improved search functionality, integration with the AdSense Help Center and others
* Better spam detection and prevention (Nice! Thanks...) 
* Public recognition of Top Contributors (Great!) and frequent posters 
* Ability to subscribe to ask questions and receive answers via email (mmm... spam? joke...)

Source (The New Forum): http://www.google.com/support/forum/p/AdSense?hl=en

In my experiences, Google Adsense Team has the Best Customer Service.

Quick, Easy and Straight Forward.

No wonder why it is now the Best Advertising option in the World.

Keep up the Great Work... :)

Please Read more News and Tips: Windows Xp, Web, Soft Review and Hacks

Thursday, October 30, 2008

Windows 7 Features: New UI, Networking, Media Player, Device Stage and Customizations

There are lots of improvements in User Interface, Controllability and Usability that brings together and getting things done easily.

Windows 7 Presentation at PDC 2008 #1 by drphysx

Windows 7 Presentation at PDC 2008 #2

Now, Microsoft is getting it done correctly.

Can't Wait to Download and install Windows 7 Pre-Beta Version :)

Wednesday, October 29, 2008

Windows 7 "Touch For Engineers"

This is the first time I have seen the huge possibilities of Multi-touch application of Windows 7. It's like a dream come true for Draftsmen, AutoCad Technicians and Engineers, Architects, Civil Engineers, Electronics Engineers, Mechanical Engineers and others.

What If instead of typing "ext" for extrude, just slide up and input the height. SWEEEEET!!!!!!!!!!!!!!!

I'm looking forward for this next generation of products that will be build in Windows 7 platform (Oppps... It's Vista version 2).

Hopefully in the future, I can build applications in AutoCad for Windows 7 :)

AutoCad for Geeks!!!

Thanks terolehto for sharing the video...

Monday, October 27, 2008

Unable to Change the Login Password in Windows Vista

It's a great day. Enjoying your brand new laptop with Windows Vista Home Premium SP1 installed. Then suddenly for unknown reasons, you want to change the password to Windows but you can't because it doesn't accept the correct Current Password. Are you kidding me?

This unexplainable thing happened last month in my friend's computer. Somebody hack and changed the password? Incorrect Password, Forgot the correct one? Or a Home Premium Bug?

1. She went to Control Panel > User Accounts > Change Password

change

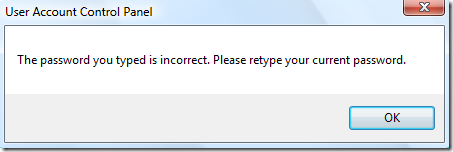
2. After entering the Current Password, New Password, Confirm new password and Password hint. This message appears:

password is incorrect

"The password you typed is incorrect. Please retype your current password"

3. Shocked by what happened, she quickly call and ask what to do.

What did I do? Think Deep...

If we will reboot or log-off the User, she needs the correct password to login to that account.

There are many possible ways to fix the problem:

1. Clear the Password

2. Use/Create a Password Reset Disk

3. and many more...

Simple Way: I told her to create a  new Administrator Account and remove the password

a. Open the User Accounts > "Manage another Account" > "Create another account"

b. Type the new Account name > Choose Administrator and afterwards, Click the Create Button

Thinking that if we restart or log-off the system, she will not be able to login to her account. I'm Correct! :)

c. After log-off, She cannot login to her account. I ask her to login to the NEW account that we have just created.

d. Finally, I told her to remove the password of her account by using the NEW Administrator Account:

Open the User Accounts > "Manage another Account" > Click the Account > Choose "Remove the password" link and finally, hit the Remove Password Button

:)

Updated: How to Change the Password using Command Prompt

Launch as Administrator: Type cmd in Start Search and press CTRL+ALT+Enter

Syntax:

Net User [Username] [P@assword]

or

Net User [Username] *

- Thanks Brian

Example: Net User LawrenceAlbert mynewp@assw0rd

             Net User LawrenceAlbert *

changingpassword 

Read more Tips: Windows Vista Tips, Tricks and Tweaks

Tuesday, October 21, 2008

Add "Hide This File" and "Hide This Folder" to your Right-Click / Context Menu in Windows Vista and XP

hidethis

Due to UAC (User Account Control) which is a great security feature of Windows Vista, there's a need to elevate any command that requires administrators approval. Adding Hide or Unhide option or item in Right-Click Menu is not as simple as in Widows XP.

Anyway, If you downloaded and learned how to use WinBubbles Context Menu Customization Tool before and just a little script by hacking WinBubbles files. It's Easy!

Note: This Guide is For Intermediate to Advance Users. Stay tuned: The next version of WinBubbles will do it in just TWO CLICKS, Not just for the Geeks But For All.

  1. From Command Elevation Template, use: attrib +h(space) and save the file as .vbs file-extension, e.g. hidethis.vbs 
  2. The seventh line should be like this:

objApp.shellExecute "cmd.exe", " /c attrib +h " & chr(34) & strArg & chr(34), , "runas", 1

If your afraid to commit a mistake, just Download the Vb Script file. Right-Click > Save Link/Target As

Note: Click the Backup Button to save the original settings.

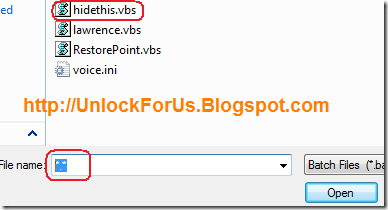
3. Open WinBubbles and go to Miscellaneous Tab > Click the Windows Explorer (All Files) Button. Type any name in the Name Field > Click the Browse Button > type *.vbs or simply *.* and Click the VB Script File to set the Path.

browse

Finally, Edit the Command Field by adding "wscript", quotes for path and "%1" and Click the Add Button. That's it!

Name: Any name e.g. Hide This File

Command: wscript "Path" "%1"

Example:

wscript "C:\Downloaded\WinBubble 1.76\Tools\hidethis.vbs" "%1"

For Adding Context Menu in Folders, Click the Folder/Start Menu Button and Use the same procedure above (#3).

Note: If you can't make this work and you want to remove the entry, don't worry just Click Windows Explorer (All Files) Button >  Click the Item name and  then, Finally the Remove Button.

Windows XP Guide

In Windows XP you can easily add "Hide/Unhide" option to context menu by adding this registry entry:

Note: If you can't understand and your afraid to edit your registry. Study them first and use WinBubbles by Reading the end part of this guide.

Hiding any files:

HKEY_CLASSES_ROOT\*\shell\Hide this\command

Double-click (default) > type: attrib +h "%1"

Where "Hide this" is any name that you want.

To Unhide:

HKEY_CLASSES_ROOT\*\shell\UnHide this\command

Double-click (default) > type: attrib -h "%1"

How about For Adding Context Menu for Folders?

just add this path:

HKEY_CLASSES_ROOT\Directory\shell\[Anyname]\command

[Anyname] = any folder name that you want

e.g. Hide this folder, Unhide     respectively...

(default) > attrib +h "%1" for hiding the folder only

(default) > attrib -h "%1" to unhide


Are you afraid to edit your registry? Don't worry, WinBubbles will work in Windows XP if .Net Framework is installed. Normally, It is installed by default to newer computers especially the branded ones.

For Files Context Menu:

Open WinBubbles > Miscellaneous Tab > Click the Windows Explorer (All Files) Button > Type the name and command 

Name: Hide this File

Command: attrib +h "%1"

Click the Add Button.

For Folder Context Menu:

Just Click the Folder/Start Menu Button and Use the same procedure above.

Simple Right? Enjoy!!!

Universal RunAs Script Template in Elevating Commands as Administrator in Windows Vista

Can't Add a Command to Context Menu? How to run and elevate commands automatically using shortcuts or Context Menu in Windows Vista?

In Windows XP you can run any command easily, just type and launch. Life was easy... But we didn't think of the vulnerabilities that came and exploited several computers around the world.

Windows XP Vulnerabilities

I remember one time, somebody is having some fun with me that after restoring the original or manufacturers copy of Windows XP. An Adware type alert message (net send) was sent through Messenger Service remotely.

A friend of mine told me that her computer had worms, adware problems and hidden viruses since 2007 but she just ignored and lived with it until her Windows XP crashes and all the data was lost.

Problem with Windows Vista UAC

Most of us don't understand the great security feature of Windows Vista called User Account Control or simply UAC. If we will just open our mind and think in a broader way. You'll save a lot of time and money.

In every good feature there is always an effect; good or bad and in Vista that is called COMPLEXITY.

Examples:

From Simple Ways to Tweak your Network and Internet Connections

ipconfig /flushdns

The requested operation requires elevation.

From my article Hiding Computer Name from the Network Explorer:

net config server /hidden:yes

System error 5 has occurred.

Access is denied.

Note: If you'll run these commands one time only. To elevate, just type "cmd" in Start Search > press CTRL+Shift+Enter and type the command. that's it!

If you want to create a shortcut or add to Context Menu, it will not work because you need to elevate it first.

General Solution: Create a Universal Script that will Elevate any Command Automatically

1. Download WinBubbles, Extract and Open the Tools Folder

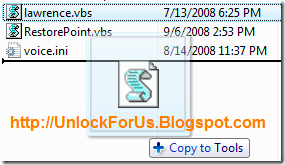
2. Create a Duplicate of the file "lawrence.vbs" by pressing CTRL and dragging the file into the same directory.

duplicatecopy

3. Rename the file to any file name that you want as long as it has a file extension of ".vbs"

example: hidethis.vbs

4. Open the File in the Notepad and modify the seventh line

objApp.shellExecute "cmd.exe", " /c CommandswithArguments" & chr(34) & strArg & chr(34), , "runas", 1

Now you have a template in creating Right-Click Menu Items with Command Elevation. Sweet!!!

Read, learn the examples below and Add them to your Context Menu using WinBubbles Context Menu Customization Tool.

CommandswithArguments Examples

attrib +h(space)        >>>...Click here for more Details

net config server /hidden:    >>> ...Click here for more Details


Another kind of Universal Script Template:

Switching using Parameters

objApp.shellExecute "cmd.exe", " /c  CommandswithArguments " & strArg & " Arguments", , "runas", 1

To understand, Please Read this Example: Click here


Learn more: How to Run VBScripts as Administrator in Windows Vista

Enjoy!

Saturday, October 18, 2008

Simple Way to Monitor Opened Files in a Shared Folder Across the Network

Your a Beginner, Intermediate or Knowledgeable in computers and your connected to the Internet. Windows Vista will let you choose 3 options: Home, Work and Pubic. Which option will you select?

When you use Yahoo Messenger, Skype, MSN Messenger and other Instant Messenger applications. Are WE Safe?

Please share your ideas below...

Simply by using "net use" and "net view" command you can connect and share files across the Local Area Network and even from one country to another.

If you want to try using Windows Explorer. It will hang while browsing the Network Neighborhood. So start by studying the command: net /?

During the Windows 98 days, I usually shared my files to my friend several kilometers from our house using the ordinary 56kbps modem and the Dial-up Networking Server feature. Back then, It was so awesome and exciting that we can play games, copy mp3s and shared docs without using the Internet as a backbone.

That learning and fun experiences brought me in understanding the world of Internet.

Let's go back to the Main Topic. Who's accessing your files across the Network? How can we check if someone or somebody is accessing my shared files?

1. Right-Click the Computer Icon > Manage

2. Once Computer Management is Open > Expand the Shared Folders and Take a look at the two features: Sessions and Open Files

Windows XP: Sessions

sessionsXP

The User LAWRENCE is connected and using the Computer with IP-Address 192.168.0.1

Windows Vista: Sessions

sessionVista

Windows XP: Open files

openfilesXP

The User Lawrence is opening the file called sessions.png located at the folder d:\la files\whos accessing\

Windows Vista: Open Files

OpenFilesVista

Note: The same in Windows 2000

To monitor the other PCs: Click the Action Menu > "Connect to another computer..." and make sure that you have enough access rights.


For more Network Related Articles:

NEW [Vista/XP] How to Set up Ad hoc Wifi Wireless Networking Without a Router

NEW [Vista/XP] How to Share Internet Connection in Ad hoc Network

[Help] How to Setup Broadband DSL Internet Connection in Windows Vista for a Single PC

Windows Vista Unlocks, Tips, Tricks and Tweaks

Tuesday, October 14, 2008

Tips and Tricks: Use the Task Manager like a Widget or Sidebar Gadgets

play

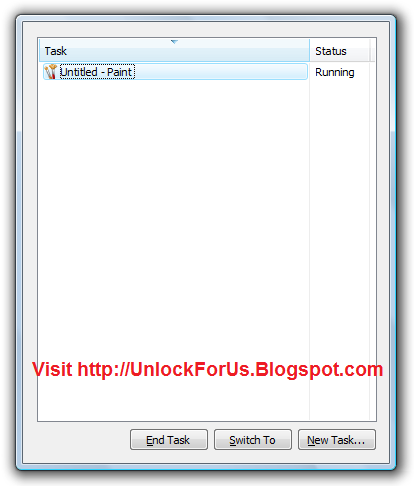
An anonymous user gave a useful information about the missing taskmanager menus.

"by getting rid (remove) of the menues and then make the window as small as possible to just show the one process you are are looking at."

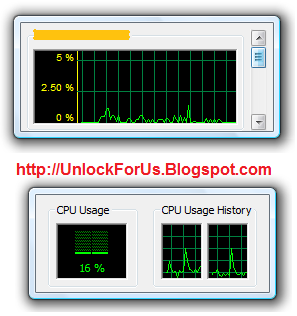
Puzzled by what it can do more, I started to think and experiment with it. Wow! The Task Manager can be use to monitor your services, Cpu Usage and Network Bandwidth without using Sidebar Gadgets in Windows Vista.

Cpu Usage and History Gadget-like Task Manager

Press CTRL+SHIFT+ESC to launch the Task Manager, Click the Performance Tab and then double click any vacant space around the Tab. That's it! you can resize and put it anywhere around your desktop.

Task Manager as a Gadget-like Network Bandwidth Utilization Monitor

Same as the procedure above. Just Click the Networking Tab and Double-click any vacant space.

Now you can (somewhat) monitor if someone is accessing your shared folders across the Network.

Simple, Nice and Sweet! Enjoy!


More Fun Stuff:

Change and Hack your Windows Experience Index (WEI) score

Monday, October 13, 2008

Task Manager's Menu Bar, Tabs, Minimize, Maximize and Close Button is Missing in Windows XP and Vista

Fun Stuff: When you press CTRL+ALT+DELETE in XP and CTRL+SHIFT+ESC in Vista, your Task Managers File Menu, Option, View and Help Menu Gone!? Got infected by a virus or just a trick?

TaskManagergone 

An old Windows XP Trick that Vista inherited and most of the people even the tech-savvy ones don't know about it.

vacantspace

To Restore and Bring it Back, Just double-click any vacant space or Border and it will be back to normal :)

How to hide the Top Menus again? It's the same... find some vacant space and just double-click it.

Enjoy!

Read More:

Change and Hack your Windows Experience Index (WEI) score


Thursday, October 9, 2008

How to Set-up Windows Vista/XP Ad hoc Wifi - Wireless Networking Without a Router

adhocnetwork

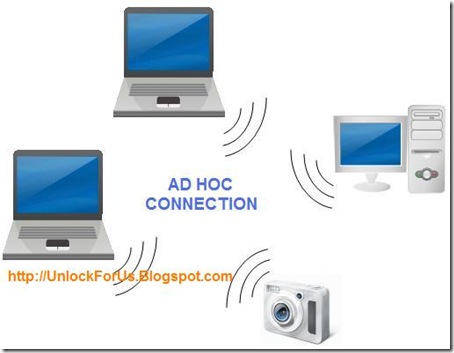
Based on my observation, an adhoc network is a wireless network connection without a central node. The network is dispersed which requires no base station (Router).

Using the Network Setup, devices such as PSP, Laptops, and other portable gaming consoles can search, share and link each other within range without using a router or a hub.

Advantage

  1. Easy to setup: No additional Software is needed and It's FREE
  2. Nowadays, By default Wi-fi or Wireless Card is included when you bought a computer especially in laptops. Even if it's not included USB type Wifi is now cheap.
  3. Portability and Mobility
  4. No more wires and additional devices such as hub and routers

Main Disadvantage

If you'll share or connect other computers and devices to the Internet. The computer that is connected to the Internet (Gateway) must always be turned on. Unlike using a router, you can turn off any computers in the network.

Read more: Internet Connection Sharing (ICS) in Ad Hoc Connection

Distance: Computers and devices in ad hoc connection must be within 30 feet of each other (although you can extend this by using a passive repeater by simply creating a parabolic antenna using a USB type Wi-fi and other types of antenna)

How to Create an Ad hoc Wireless Network (Automatic IP Address Configuration)

Windows Vista

1. Launching Setup a Network or connection Window

Choose "Set up a wireless ad hoc (computer-to-computer) network Set up a temporary network for sharing files or an Internet connection"
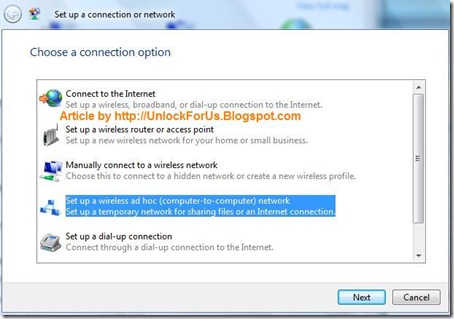
setup

There are several ways to access this Window, here they are:

a. Right-Click the Wireless Network Icon in the Taskbar's Notification Area > Connect to a Network > At the Bottom, Click the Setup a Connection or Network

b. Right-Click the Wireless Network Icon from the Notification Are > Network and Sharing Center > In the Left Pane, choose Setup a Connection or Network link

c. Start Menu > Connect To Button > At the Bottom, Click the Setup a Connection or Network link

d. Using the New Control Panel View: Start Menu > Control Panel > View network status and tasks > In the Left Pane, choose Setup a Connection or Network link

controlpanelhome2

Using the Classic Control Panel View: Start Menu > Control Panel > Network and Sharing Center > In the Left Pane, choose Setup a Connection or Network link

2. Creating Ad hoc Network Window
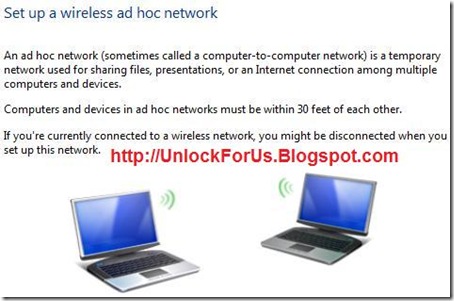
setup22

"Set up a wireless ad hoc network

An ad hoc network (sometimes called a computer-to-computer network) is a temporary network used for sharing files, presentations, or an Internet connection among multiple computers and devices.

Computers and devices in ad hoc networks must be within 30 feet of each other.

If you're currently Connected to a wireless network, you might be disconnected when you set up this network."

Click Next Button to Start Creating Ad hoc Network.

3. Write the Network Name, Password (Security Key) and other Security options (No authentication (Open)/WEP/WPA2-Personal)
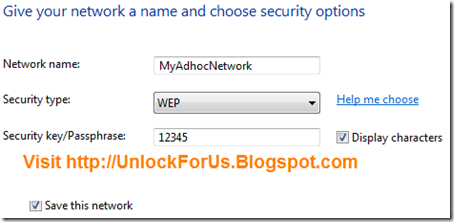
setup33

4. Click the Next Button to Create and Connect to the Network
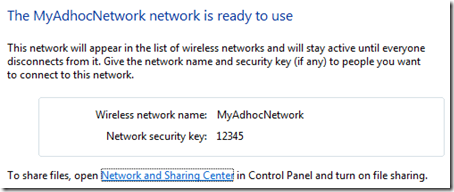
setup44

To be able to activate the Ad hoc Network that you have just created, more than 1 computers or devices must be connected to the network.

Setting up the IP-address in Vista/XP
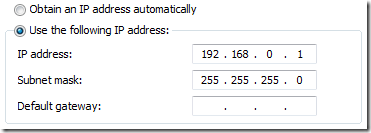
1

1. From my previous tip: Open the Network Connections

type and launch the command: ncpa.cpl

or Control ncpa.cpl

2. Right-Click the Wireless Network Connection > Properties > Internet Protocol Version 4 (TCP/IPv4) > Properties Button > Select "Use the following IP address:"

Examples: Class C - Most Common Home Configuration

Computer A Computer B Device C

192.168.0.1

192.168.0.2

192.168.0.3

255.255.255.0 255.255.255.0 255.255.255.0

Range: 192.168.0.0 - 192.168.255.255

For more information: http://en.wikipedia.org/wiki/IP_address

To Connect: Right-Click the Wireless Icon > Connect to a Network > Find the name of the ad hoc Network > Click the Connect Button > Input the Passphrase or Security Key and finally Click the Connect Button again.

Windows XP
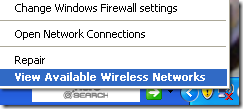
viewwirelessnetworks

Right-Click the Wireless Network Icon > Choose View Network Wireless Networks

In the Left Pane > Click "Change advanced settings" link
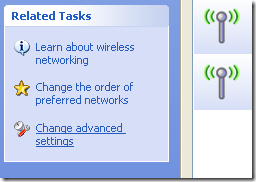
changeadvancedsettings

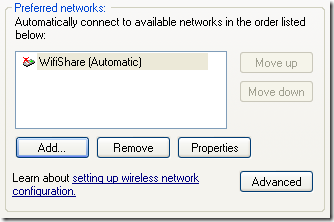
Make sure that you are using Windows to configure your wireless network settings and click the Add Button
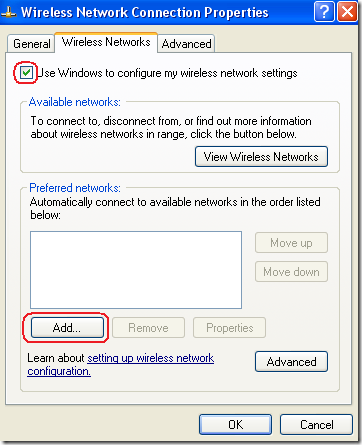
adding

Enter the Network Name (SSID), Set the Network Authentication, Data Encryption, Network key and Choose the option "This is a computer-to-computer (ad hoc) network; wireless access points are not used.
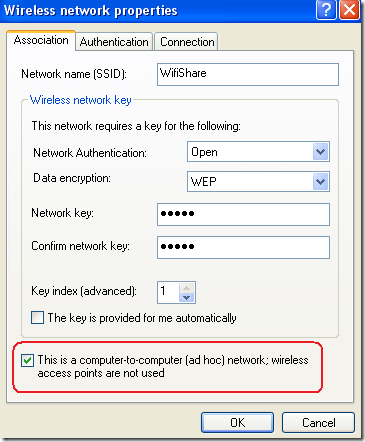
namenetworkkey

Finished.

finished

Enjoy!

Network Related Tips:

Simple Way to Monitor Opened Files in a Shared Folder Across the Network

[Help] How to Setup Broadband DSL Internet Connection in Windows Vista for a Single PC

Simple Ways to Tweak your Network and Internet Connections- Part 1

Simple Ways to Tweak your Network and Internet Connections- Part 2

[Vista/XP] How to Share Internet Connection in Ad hoc Network

wiredorwireless

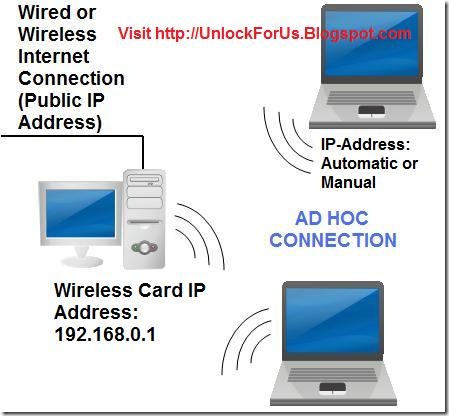
As long as the Internet Connection can be shared (Dynamic or Static Public IP Address) through a Hub, Cross-Cable, Straight Through, USB cable, Wired/Wireless Modems and other types of medium; you can share it also within the Ad hoc Network without using a Router. Works in a Desktop PC or Laptop!

Configuring Windows 2000, XP or Vista as the Gateway

In this configuration, I recommend to put/allocate the IP address of the Wireless Adapter of Computer with Internet Connection Fixed or Static.

opennetworkconnection

In Windows 2000 or XP

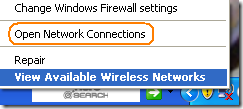
Right-Click the Wireless Network Icon > Open Network Connections


In Windows Vista

In Vista Type ncpa.cpl in Start Menu Search

Applicable For All Version of Windows

Right-Click the Correct Wireless Network Connection > Properties >

"Internet Protocol Version 4 (TCP/IPv4)" in Windows Vista / Only "Internet Protocol (TCP/IP)" in Windows 2000 and XP > Properties

Choose "Use the following IP address:" and enter the following

IP address: 192.168.0.1

Subnet mask: 255.255.255.0


Other Computers (XP, Vista or Windows 200) - You can set this Automatic or Manually set the IP Addresses bellow:

IP Address: 192.168.0.2 - 192.168.0.255

Subnet Mask: 255.255.255.0

Default Gateway: 192.168.0.1

DNS Server: 192.168.0.1

For more information, Please Read here


Enabling ICS

1. Go to the Gateway or Desktop Computer and From my previous Tip: Open the Network Connection Window by simply launching the command: ncpa.cpl

or Control ncpa.cpl

2. Click the local area network (LAN) for DSL/Cable Internet Connection, WAN Miniport (PPPOE) for iBurst, USB Modem for GPRS, 3G, HSDPA or any type Dial-up Networking that provides you a primary Internet Connection > Right-Click Properties

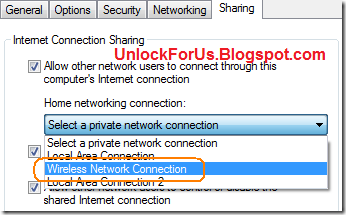
3. In the Sharing Tab (Advanced Tab in Windows XP), Click the option "Allow other network users to connect though this computer's Internet connection" > Choose the Wireless Network Connection

sharingtab 

NOTE: If you're using GPRS, 3G or HSDPA as your primary Internet Connection. Neglect the Message "Since this connection is currently active, some settings will not take effect until the next time you dial it":

message

How about Wired Networks? Read Here


Now Start Connecting other laptops/PC/devices and test the Internet Connection.

To Connect the other Computers: Right-Click the Wireless Icon > Select "Connect to a Network" For Vista or "View Network Wireless Networks" for XP > Click the name of the ad hoc Network and Again, Click the Connect Button > Input the Passphrase or Security Key and finally, Click the Connect Button again.

Windows Vista Note: If you are using a Broadband Dial-up Networking to connect and the Username and Password was saved for the current logon user only. It will automatically dial and connect to the Internet if the current user are logged on.

So, if the gateway computer is not yet connected and the other computers across the network (request) browses the Internet, it will automatically dial and connect to the Internet. Cool Right?

Just make sure that the Wireless Adapter in the Gateway Computer is connected to the adhoc Network. That's it!


Enjoy surfing the net!!! :)


Network Related Tips:

NEW Simple Way to Monitor Opened Files in a Shared Folder Across the Network

[Help] How to Setup Broadband DSL Internet Connection in Windows Vista for a Single PC

Simple Ways to Tweak your Network and Internet Connections- Part 1

Simple Ways to Tweak your Network and Internet Connections- Part 2