Sunday, September 28, 2008

[Vista/XP] Worm Busted Part 2! How to Detect, Clean/Remove Manually inside the USB Flash Drive

Page 1 2 3

AUTOPLAY Unlock For Us

Last time, I wrote a two pages detailed guide on how to fix/detect the problem in "Application not a Found" Error Message when a USB stick or CD/DVD is inserted and we found out that the possible reasons is a damaged CD or an Infected one.

Now, What if there is no message at all? How can we know if there's a virus exists?

Here: Worm / Virus Busted Part 2!

..................................................................................

When you insert a usb flash disk, your Anti-Virus software will not automatically know or detect that it has a virus unless you've clicked the file in windows explorer. In Windows Vista, UAC will prevent the execution of the program from running and start exploiting the Autoplay feature by asking a confirmation message.

So as a regular user, how can we know or prevent that?


1. DO NOT RUN ANY PROGRAM WHEN YOU INSERT THE USB DISK.

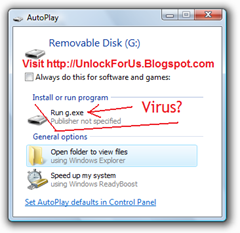
I'm sure your familiar in all files saved inside your USB data disk. If you know that there is no software installed to automatically run when you insert the USB then, CLICK THE CLOSE BUTTON in AutoPlay Window.


2. UNHIDE/SHOW ALL HIDDEN FILES AND FOLDERS IN WINDOWS EXPLORER

When you've noticed that there is a program that wants to open after inserting the USB flash disk, as shown in the picture above.

How? Open Windows Explorer, Press Alt-T > View Tab > Choose the option "Show hidden files and Folders"


3. Open the drive and start searching for hidden files.

Gotcha2  

Gotcha! It's another kind of worm exploiting AUTORUN.INF

g.exe, vmhr.bat, wvcst.vbs

>> READ MORE: Go to Second Page

The Best Protection Against Worms in Windows Vista

Continuation: Page 1 2 3

These things happened several weeks ago and It's really creepy. There are many variants and kinds of worms now. No wonder why Microsoft enabled UAC by default in Windows Vista.

For Better protection:

1. Turn ON UAC (User Account Control) In Windows Vista

Using WinBubbles: Security Tab > Prompt for Consent (Default/Recommended) > Click the Apply Button or simply press "ALT-A"

2. Turn OFF/Disable Autoplay in Windows Vista/XP

Download and Open WinBubbles > Go to Security Tab > Disable AutoPlay in all types of media > Simply press "ALT-A" or click the Apply Button

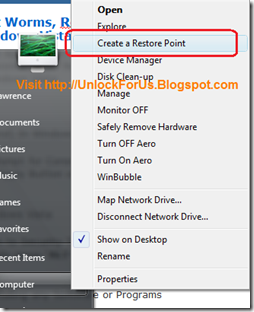
createarestorepoint


3. Create a Restore Point Before Installing any Software or Programs

This will let you recover system files that has been modified and restore your Computer after installation of Incompatible Drivers:

- Put a "Create a Restore Point" Context Menu


4. Learn How to Check and Restore your Windows System Files

- How to use SFC.EXE Tool in Windows Vista

5. Please read my first article about Worms:

Opening CD/USB Drive "Application not found" [Vista-XP Security: Virus/Worm Busted!]

6. Always Update your copy of Windows Vista by installing Service Pack 1 and other Windows Security Updates


For Best Protection:

Follow and learn the recommended steps above, and Install the Best Free Anti-virus Programs like AVG and AVAST


>> Last Page

What?! It's Another Worm: SVHOST.EXE and NEW FOLDER.EXE

Continuation: Page 1 2 3opening

No Doubt, Windows Vista UAC Nails any Rootkits and Worms.

 findout

Autorun.inf, SVHOST.exe and New Folder.exe: Partners in Crime

[Autorun]
Open=SCVHOST.exe
....

In any hybrid systems like Microsoft Windows, we must choose and see things in the long run.

Turning ON the Annoying UAC and Learn from it or get Unknown Virus in the future that can't be detected by Any Anti-Virus or Anti-Spyware Software?

You Choose...


Read more:

Opening CD/USB Drive "Application not found" [Vista-XP Security: Virus/Worm Busted!]

Opening CD/USB Drive "Application not found" [Vista-XP Security: Virus/Worm Busted!]-2

Friday, September 26, 2008

[Vista] FIX: Your phone is in file transfer mode and cannot be used with PC Suite...

When you try to connect your Nokia Phone via USB in Windows Vista the Error message occurs. Also, we will notice another message in Nokia PC suite and a Tool Tip in the Notification area that says:

"Nokia Device Bus connected in non-compatible mode..."

Other Symptoms:

1. You cannot connect the phone to your laptop / PC

2. Nokia Browser through Windows Explorer is very slow

3. Connecting the phone and setting as Mass storage most of the times doesn't work.

4. Windows Explorer is always closing and restarting.

5. Lots of Error messages while using Nokia PC Suite.

errorcaused2

Main Cause:

  1. By Clicking the Option "Locate and install driver software (recommended)", you are allowing the old incompatible Device Driver to be installed (CDC Comms Interface). Therefore, next time you plug-in your Nokia phone, it will automatically connect, re-install the driver and the error message will appear.
  2. You are using the older and incompatible version of PC suite in Windows Vista

[Prevention is Better than Cure]:

Download and open WinBubble to create a Context Menu/Right-Click Item and use it to create a restore point manually before installing, using or connecting anything devices in your Windows Vista computer e.g. software installation and changing System Files.

Read this guide: Adding "Create a Restore Point" Right-Click Menu

Quick Solution:

1. Choose "Don't show this message again for this device"

Permanent Solution (Recommended)

If you already clicked the first option. Open System Restore by going to Start Search > type "rstrui" or simply type System restore.

Once System Restore Tool is open Choose the Description:

"Install: Device Driver Package Install: Nokia Ports (COM & LPT)"

Note: If you can't see the Description, choose the older restore point e.g. Installation of Nokia PC Suite

systemrestore

After Restoration, please proceed with the steps below:

solution2

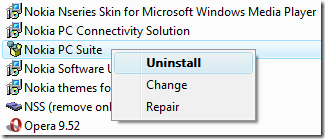
Uninstall the old version, download and install the latest software of Nokia PC Suite. The new version is Windows Vista compatible which is faster, reliable and stable build.

pcsuite7

1. It will remove all the error messages and switching the mode of connection (PC Suite, Mass Storage, Media Player and PictBridge) is fast.

2. The sluggish Nokia Browser in Windows Explorer is now stable and you will not anymore see Windows Explorer crashing.

3. Automatic Connection and detection of the phone.

Nokia Phone Models that has been reported to have this problem in Windows Vista:

"Your phone is in file transfer mode and can not be used with PC suite. Quit file transfer mode from the phone if you want to use the phone with PC Suite."

Nokia 6680

Nokia N70, N73

Nokia 3250

Nokia 3230

Nokia 6555

If your phone is not listed above and these steps solved your problem... Please write a comment below.

Thanks in Advance.

Other Fixes:

[Help] How to Fix, Repair and Restore (Recover) Windows Vista Easily

How to Restore Windows Vista Icons

[Vista] How to Restore Folder Icons to Default

"Access denied" Moving, Editing, Opening and Deleting a File or Folder in Windows Vista/XP

[Vista] Hibernate Button is gone


For more Tips:
Unlock for Us: Windows Vista Unlocks, News, Tips and Tweaks

Tuesday, September 23, 2008

[Vista] Icon Changer (It's FREE!)

There are many ways to change and customize your icons in Windows Vista: changing some of them manually in the registry, directly edit the icon libraries and changing icons using a freeware or shareware application that lets you do it easily.

Let's  Start Changing them the way that you want for Free.

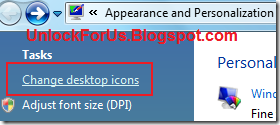
Changing Desktop Icons

Change desktop icons

Right-Click > Personalize > Change Desktop Icons

Pros: No Software needed

Cons: Limited

Changing Folder Icons

Most of the us are changing folder icons to easily find or recognize and memorize the location of the files.

Right-Click to the folder > Customize Tab

Read more: Customize your Folder Icons to Enhance Windows Vista Experience

Tips and Tricks

Using WinBubble Icon Changer, Customizing Desktop Shortcuts and Removal of Shortcut Overlay Icons

desktopicons

Some of the Applications and Softwares like Internet Explorer will not let you change it's icons easily.

TIP: Just create a shortcut on desktop, Change the Icons and Remove the Shortcut Overlay Arrow Icon.

a. Create a Desktop shortcut of the application and change the icon

a.1) Go the the Application directory (e.g. \Program Files\AppName) Right-Click and Send To Desktop (Create Shortcut)

a.2) Go to the Desktop Shotcut > Right-Click > Properties > Shortcut > Change icon... Button

b.) Remove the Shortcut Overlay icons using WinBubble

b.1) Download and Open WinBubble

b.2) At the General Tab > Click the "Remove the Shortcut Arrow" Option and Press "ALT-A" or just click the Apply Button.


Customizing and Restoring Icons with WinBubble:

winbubble

WinBubble can customize some Windows Icons as shown above. Originally, the software was designed to Restore your icons in Windows Vista Not Changing the icons. But As I developed the program, some ideas came to me and Now you can easily Change your Drive icons to High-Resolution without downloading from the web.

hardisk


Whether your just getting started or not. It let's you explore all the hidden high-resolution icons in Windows Vista. Easily...


To put them back  to it's original settings or default just click the Restore all to default Button. That's it!


Customizing your Shortcut Overlay Arrow Icon

heart WinBubble will let you change the Big Shortcut Arrow Overlay icons in Windows Vista. There's an existing icons included in the app like Heart, Star and Windows logo. You can also download from the web or create icons by yourself and set it up using WinBubble. Enjoy!

Read more: Changing Shortcut Overlay Arrow Icons


Changing Windows Vista File-Type Icons

I remember one user asked something about removing Context Menu for a certain file type. As I explore the registry, I learned how to remove entries in Context Menu and how to change the icon for a certain file type like .txt, .zip, .rar, .doc and others.

Read here: Removing Right-Click Menu Items, Customizing and Changing File Type Icons (File Extension) in Windows Vista

Removing Right-Click Menu Items, Customizing and Changing File Type Icons (File Extension) in Windows Vista

txt 

I scanned my notes several months ago, a user asked me on how to remove an item in Windows Context Menu. While exploring the registry, I learned also how to change the icon in certain file-types such as .txt, .doc, .zip, .ini, .xls., .avi, .3gp, .mpg and others.

Let's Begin on How did I find out.

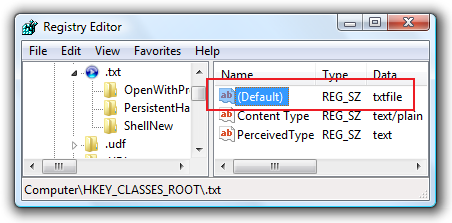
1. Open the Registry Editor: Start Search > type "regedit" and press enter.

2. This is what I wrote in my notes:

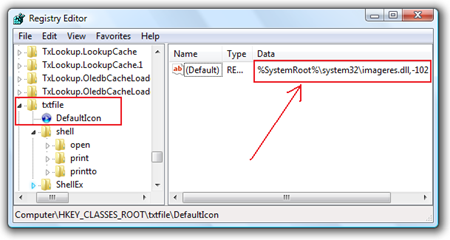
"Once I opened the Registry Editor and expand HKEY_CLASSES_ROOT. I saw ._sln (I'm thinking...) What if .txt?"

type ".txt", it will open the .txt Registry Key (Folder) and you'll notice that there's a Default value called txtfile, as shown in the picture above.

Since most of Context Menus needs a Registry Key setting like Shell\[item name]\command

I said to myself "It's not here..."

So, again I type: txtfile

Gotcha!

My point why I wrote this guide... Don't just copy the work of other people. THINK...

If you find something nice and great, even if you did not unlock it first, you'll shout YES! and I can say It's fun and exciting. You can learn many things in the registry (most of them are undocumented...)

defaulticon

.txt File Extension Icon Location

HKEY_CLASSES_ROOT\txtfile\DefaultIcon

.txt File Open and Print Context Menu Entry Location

HKEY_CLASSES_ROOT\txtfile\shell

That's it!

Note: To Backup the Original Settings > Right-Click the Key (Folder) > Export

Now, Please explore more registry Hidden settings! (It's Fun...)

Please Read the Complete Article: [Vista] Icon Changer (It's FREE!)


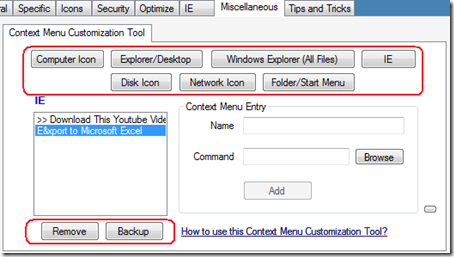
If you want to easily remove Context Menu items in Computer Icon, Folder and Start Menu Orb, desktop or Windows Explorer Right-Click Menu, Internet Explorer, hard disk and network icon: Use WinBubbles

removingrightclickmenuitems

Go to the Miscellaneous Tab and Click the Button e.g. IE > Choose which Item to be removed > To have a back up, Click the Backup Button First > Then Finally, Click the Remove Button

Enjoy!


Read more: Add your applications to Context Menu (Right-Click Menu)

[Vista/XP] Easily Remove/Clean-up Internet Explorer Context Menu Entry

Add "Hide/Show Computer" in Network Icon Context Menu

Saturday, September 20, 2008

How to Remove, Create and Add Security Policy: Disable/Enable IE7 and the New IE8 Restrictions

Adding Security Policy is very easy in Windows Vista Business and Ultimate versions. Using Gpedit.msc you can completely Customize the Security settings, enable/disable some components in Internet Explorer and others. How about Windows Vista Basic and Home Premium?

WinBubbleRestriction

In order to get the functionality of Group Policy Editor, you need to manually edit the Registry using the Documents from Microsoft or use WinBubble.

Using WinBubble:

1. Download WinBubble and go to the Security Tab

2. Choose some options and press "ALT-A" or just click the Apply Button. That's it.

Disable File Menu > New Window

Disable File Menu > Open

Disable File Menu > Save As

Remove 'Favorites' Menu, By default gone? just click to check and uncheck > Click the Apply Button > Finally, Restart IE

Useful Restrictions in Schools and Internet Cafe

Disable Right-Click Menu and Downloading Files

Disable Right-Click Menu > View Source

Disable Internet Options

Removing Tab inside the Internet Options (General, Security, Privacy, Content, Connections Tab which is famous in offices that uses Proxy, Programs and Advanced Tab)

Using Gpedit.msc (Windows Vista Business and Ultimate Versions Only)

Go to User Configuration > Administrative Templates > Windows Components > Internet Explorer

gpedit

This is an advanced and complete configuration tool for Internet explorer. Even the New Features of Internet Explorer 8 is now included and available. e.g. Accelerators and Compatability View

Enabled, Disabled and Not Configured

IE8 Accelerators

Deploy default Accelerators, This policy setting allows you to SET default Accelerators. You can Add New Accelerators but you can't removed the default ones.

Deploy non-default Accelerators, same Deploying default ones...

Note: Non-Default and Default MUST NOT Overlapped.

Turn-Off Accelerators, Users will not be able to access or use Accelerators

Turn Off COM Accelerators, Users will not be able to access or use COM Accelerators.

Use Policy Accelerators, If you Add or Enable this policy, users can only access Accelerators that are deployed through Group Policy.  NOTE: Users will not be able to add or delete Accelerators.

IE 8 Compatibility View

Turn Off Compatibility View, Users will not be able to use the Compatibility View button or manage the Compatibility View sites list.

Turn Off Compatibility View Button,This policy controls the Compatibility View button which appears on the command bar

Turn On Internet Explorer 7 Standards Mode: If you enable this policy setting, Internet Explorer will be FORCE to use Internet Explorer 7 Mode and settings. This option results in the greatest compatibility with existing Web pages, but newer content written to common Internet standards may not display correctly.

Turn On Internet Explorer Standards Mode For Local Intranet

Use Policy List of Internet Explorer 7 sites, This will allow you to add specific sites that must be viewed in Internet Explorer 7 Compatibility View and users will be able to add and remove sites from the list, but they cannot remove the entries you specify.


Read More:  Unlocking WinBubble Part 3 *Securing your desktop