Saturday, February 23, 2008

Eject your CD/DVD using the Middle mouse button

EjectCDYesterday, I published an article on how to launch programs using the Middle Mouse button. Using that principle, It is now possible to eject your CD/DVD drive using the scroll wheel button / Middle mouse button easily.

How?

1. Read the previous article:

How to launch programs using the Middle Mouse button

2. At number 8, Open the path where Winflog eXTreMe is located and use the file "ControlCD.exe"

Example: C:\Users\Lawrence\Desktop\WinFlogExtreme\ControlCD.exe

Note: If this doesn't work, ControlCD is not yet Activated, Open Winflog Extreme and click "Eject CD" to Add the Right-click -Menu entry.

ControlCD

That's it!!! Enjoy!

Related Articles:

Windows Vista Tips, Tricks, Hacks, How-To, Guides, News and Tweaks

How To Activate Flip 3d using the Middle Mouse Button / Scroll Wheel Button

How To Turn Off Aero using the Middle Mouse Button

Friday, February 22, 2008

How to Launch Applications using the Middle Mouse Button

Registry Hack! Assign any applications to scroll wheel button.

1. Download WinFlog eXTreMe

2. Click the first option (Turn ON Flip3d after the Middle Mouse button / Scroll wheel is Clicked)

3. Press Win+R > Type "Regedit"

4. Browse the path below:

HKEY_LOCAL_MACHINE\SOFTWARE\UnlockForUs\WinFlog

5. You will notice the DWORD value: "Mode" is set to 0

6. Double click and change it to 2

7. Right-Click any blank space > NEW > String Value >> Enter "Mode2App"

8. Double click >> Enter the application path:

Example: C:\Program Files\Winamp\winamp.exe

9. To tune the sensitivity (default=300), Change the value of "TrInterval". It is measured in milliseconds.

Enjoy!

Related Articles:

How To Activate Flip 3d using the Middle Mouse Button / Scroll Wheel Button

Eject your CD/DVD using the Middle mouse button

How To Turn Off Aero using the Middle Mouse Button

Windows Vista Tips, Tricks, Hacks, How-To, Guides, News and Tweaks

Wednesday, February 20, 2008

How to Restore DVD Drive Label / Names in Windows Vista/XP

Editing, Removing, Changing Drive Names or Volume Labels is extremely difficult especially for DVD/CD Drives, If you're not familiar  with Windows Registry. Here's a Tip that will save your day!

Screenshot

"I just finished changing the icons with another software I found yesterday, but until now I didn’t find a solution to those remarks! ...have been surfing the Web for a solution since 3 days ago and until now I didn’t find anyone!

...Can you help me please?" - Jorge

My Reply:

In my understanding you want to change or remove the label of these Drives to normal?
1. Press Win+R, Open Regedit.exe
2. Go to HKEY_LOCAL_MACHINE\SOFTWARE\Microsoft\Windows\CurrentVersion\explorer\DriveIcons
3. Find the drive E and F and just delete the settings.

Example:
HKEY_LOCAL_MACHINE\SOFTWARE\Microsoft\Windows\CurrentVersion\explorer\DriveIcons\F\DefaultLabel

4. Right Click the "DefaultLabel" and delete. Same in Drive E.

That's It!!!

Tip: WinBubble 1.7 can restore or edit these labels easily...here

Related Post:

Unlocking WinBubble Part 8 -Customizing Windows Vista Icons easily

Unlocking WinBubble Part 2 *Icon Customizations


Monday, February 18, 2008

How to Enable/Disable "On Resume, Display Logon Screen"

Ok! It is disabled and you want to fix this fast and easy.

settings

Method 1 , Simplest Way

Unchecked and disabled: Download the new version WinBubble and open it. It will sense that there's something wrong with your "On resume, Display Logon Screen" and it will be restored automatically. That's it!!!

Method 2

1. Press Win+R and type "Regedit.exe"

2. Go to the path below

HKEY_CURRENT_USER\Software\Policies\Microsoft\Windows\Control Panel\Desktop

3. DELETE "ScreenSaverIsSecure"

.............................................................................

If you don't want to delete it and you like it being disabled for security reasons. Open WinBubble > Miscellaneous Tab > Click "Password protect the screensavers". The result can be seen in the picture above.

Also, If you want it to be disabled with the option uncheck:

HKEY_CURRENT_USER\Software\Policies\Microsoft\Windows\Control Panel\Desktop

Create a dword value "ScreenSaverIsSecure", double click it and input zero (0)

That's it! Thanks to Parry@WinMatrix in Opening the topic :)

Enjoy!

Saturday, February 16, 2008

Activate Flip 3d using the Middle Mouse Button / Scroll Wheel Button

Enhance your Windows Vista Experience by assigning your middle mouse button to launch or activate Flip3D.

AllFlip3d

Nowadays, Having a mouse with scroll wheel or middle mouse button is not rare. In just one click you can add a functionality that can open Flip 3D easily.

How? Download WinFlog eXTreMe and click the first option:

AssignMiddleMouseButton

Enjoy!

Related Articles:

Eject your CD/DVD using the Middle mouse button

How to Turn Off Aero using the Middle Mouse Button

How to Launch Applications using the Middle Mouse Button

Adding Entries to Computer, Internet Explorer, Explorer/Desktop, Network and Start button Context Menu (Right-Click Menu)

WinFlog eXTreMe, Enhances your Everyday Windows Vista Experience

WinBubble, Customize and Tweak your Windows Vista Easily

Ten ways on enhancing your Windows Vista User Experience

Branding your Windows Vista Computer

Turn Off Aero using a Keyboard Shortcut

Turn Off/On Aero using the Middle Mouse Button

This tip is not for all but extremely helpful in some cases. If your a gamer or mobile laptop user, turning off Aero will give a minimal boost in performance and a good battery life.

AssignMiddleMouseButton

Note: This will NOT Deactivate Flip 3D

How? Download WinFlog eXTreMe and click the second option.

Wow, It's too easy...Enjoy!


Related Articles:

WinFlog eXTreMe, Enhances your Everyday Windows Vista Experience

How to Activate Flip 3d using the Middle Mouse Button / Scroll Wheel Button

Windows Vista Tips, Tricks, Hacks, How-To, Guides, News and Tweaks

How to Launch Applications using the Middle Mouse Button

Eject your CD/DVD using the Middle mouse button

Turn Off Aero using a Keyboard Shortcut

Windows Vista Tip, Create an Aero On Off and Flip3D Shortcut

Desktop Window Manager Command list

WinBubble, Customize and Tweak your Windows Vista Easily

Tuesday, February 12, 2008

How to Restore Windows Vista icons

Recently, I have noticed that tons of users ask a question on how to restore certain icons in Windows Vista.

Here's a quick and easy solution:

restoreicons  
WinBubble can do it in just one click!

How?

Open WinBubble > Icons Tab > Choose the icon and Click the "x" button. or Simply click the Restore all to default button. That's it!

WinBubble can reset the following to it's default icons:

Documents, Pictures, Favorites, Music, Videos, Contacts,
Computer, Control Panel, Network Neighborhood, Recycle bin, Username (Users Folder), Desktop Folder, Downloads folder and Open Folder Icon

Note: Don't forget to Restart your computer afterwards.

Please Read more Tips:

How to Restore Folder Icons to Default

How to Fix, Repair, Recover and Restore Windows Vista


Enjoy!

Sunday, February 10, 2008

Close Multiple Programs at the Same Time

shot

Got tired of closing all applications one by one. Especially those unstable ones! Here's a Tip to Kill 'Em All at the same time.

e.g. Internet Explorer, Firefox, Windows Media Player...

Method 1

This is the easiest method but it's limited: Press CTRL > Click the Programs in the Taskbar > Right-Click > Close Group. That's it!

Method 2

1. Open the Notepad and Task Manager (Ctrl-Shift-Esc)

taskmanager

List the programs that you want to kill (Close).

2. Follow this syntax: Taskkill /IM [Image Name in the Task Manager]

To Force the application to close:

Taskkill /IM [Image Name in the Task Manager] /F

Notepad 

3. Save it as a .BAT file (Example: killemall.bat)

killemall

4. Add them to your Context Menu by using WinBubble or just Manually Add them to your Start Menu / Computer Icon / Desktop / Windows Explorer Right-Click Menus.

How-To? Here's the guide:

Adding your applications to Context Menu (Right-Click Menu)

Note: Don't forget to change the options to batch files after clicking the Browse button in WinBubble.

changetobatchfile

Enjoy!

.........................................................................

Friday, February 8, 2008

Adding Entries to Computer, Internet Explorer, Explorer/Desktop, Network and Start button Context Menu (Right-Click Menu)

Customizing your Context Menu just got easy!

ContextMenucust

Now, you can add any Right-Click Menu entries to your Computer icon, Internet Explorer, Explorer/Desktop (Blank spaces), All Files in Windows Explorer, Disk, Network and Start Button/Folders in Windows Vista easily.

Using WinBubble you can add any applications in your context menus without digging your Windows registry!

How? Just Open WinBubble > Miscellaneous Tab > Choose and click which button you'll use > Type the name of the application and locate the program by clicking the Browse button. That's it!

Example: HOW TO ADD WINAMP IN THE CONTEXT MENU: (As Requested)

Don't forget to click the backup first...
Open WinBubble > miscellaneous tab > Click "windows explorer (all files)" > type "WinAmp" or any in the name > Click the browse button for the path > add " %1"

Name: WinAmp
command: [path] %1

Lastly, Click the Add button... That's it!!!

Enjoy!!!

Note: In Internet Explorer, Permission must be set first and the added Entries will become the default application that will open instead of IE.

Manually Adding the Entries (Windows Vista and XP):

As I have promised WinBubble "Customization and Tweaking, Not Just for Geeks But for All" will start the idea of Simplicity and Knowledge.

1. Open the Regedit.exe and expand the HKEY_CLASSES_ROOT

2. These are the location of Context Menu Customization settings:

Computer: CLSID\{20D04FE0-3AEA-1069-A2D8-08002B30309D}\shell
Internet Explorer: CLSID\{871C5380-42A0-1069-A2EA-08002B30309D}\shell
Network: CLSID\{F02C1A0D-BE21-4350-88B0-7367FC96EF3C}\shell
Start Menu/Folders: Directory\Shell
Desktop/Explorer: Directory\Background\shell\
Windows Explorer (All Files): *\shell\
Drives: Drive\shell

3. Create a folder inside the path above. The folder name is the one that will be seen in the context menu.

HKEY_CLASSES_ROOT\CLSID\{20D04FE0-3AEA-1069-A2D8-08002B30309D}\shell\Open WinBubble

4. Add another folder named "command", double click "(Default)" and enter the location of the file. You can use a command-line parameter or switch in executing the application.

HKEY_CLASSES_ROOT\CLSID\{20D04FE0-3AEA-1069-A2D8-08002B30309D}\shell\Open WinBubble\command

For Windows Explorer Open With Commands:

HKEY_CLASSES_ROOT\*\shell\Open with Notepad\command

click "(Default)" and enter these: notepad.exe %1

Enjoy!

More EXAMPLES:

Note: Click the Backup Button to backup the original settings

1. Add "Shut OFF" in computer context menu, to turn off your laptop monitor:
1. Download WinFlog Extreme
2. Extract the file and locate the file "WinFlogTurnOff.exe"
3. Open WinBubble > miscellaneous tab > Click "Computer" > type "Shut Me Off" or any in the name > Click the browse button for the path and browse where "WinFlogTurnOff.exe" is located.

Name: "Shut Off"
command: [path]

2. Add "Eject my DVD" in computer context menu:
1. Download WinFlog Extreme
2. Extract the file and locate the file "ControlCD.exe"
3. Open WinBubble > miscellaneous tab > Click "Computer" > type "Shut Off" or any in the name > Click the browse button for the path and browse where "ControlCD.exe" is located.

Name: "Eject my DVD"
command: [path]

Lastly, Click the Add button... That's it!!!

My other ideas: Add a Restart, Shutdown, and Sleep Context Menu

Other tips:

Cleaning Internet Explorer Context Menu Items or Entries

Removing File-type Menus and Changing File Type Icons in Windows Vista

Add "Hide This File" and "Hide This Folder" to your Right-Click / Context Menu in Windows Vista and XP

Kill 'em All: Close Multiple Programs at the Same Time

Add "Hide/Show My Computer" in Network Icon Context Menu


Thursday, February 7, 2008

WinBubble is the best free TweakUI replacement - Woody Leonhard, Windows Secrets Newsletter

winbubble My favorite multi-awarded author, Woody Leonhard, who is adored blindly and excessively by everyone (Of course by Me), now living in thailand with his father, beautiful wife and sons. Surprisingly chooses WinBubble as his favorite Vista Tweaker. Wow!

Here: WinBubble is the best free TweakUI replacement - WindowsSecrets.com

My favorite Vista tweaker is a very unassuming, free little program from Lawrence Albert called WinBubble… it sure beats the daylights out of editing the Registry by hand. And the results will perk up your day. Guaranteed.”  - Woody Leonhard, Windows Secrets Newsletter, 7 Feb 2008, WindowsSecrets.com

In recent weeks, he worked with several utilities that slice and dice Vista: TweakVI, Vista Smoker Pro, Fresh UI, Vispa, Stardock's Tweakvista and WinBubble. He tests and consider in detail each utility as stated in the paid version of Windows Secrets Newsletter.

Why WinBubble hit the sweet spot in his tests?

"Like Vispa, WinBubble doesn't require any installation regimen at all. Just unzip the downloaded file and stick it into a convenient folder. The program runs clean, without putting any hooks into Vista..."

It inspired me to code more...

AM I DREAMING? Please DON'T wake me up!

My Opinion:

For me, All of them are Great Tweaking Tools... Much powerful than WinBubble. Anyway, WinBubble can combine All of them by using the Tweaking Toolbox... :)

Great Thanks to: 

Neowin.Net, WinMatrix.com, NotebookReview.com, Freewarefiles.com, Softpedia.com, MajorGeeks.com, CrystalXP.Net, TheVistaForums.com, Vistax64.com, TechPowerup.com, HardwareGeeks.com, Snapfiles.com, BetaNews.com, Wintech.com.pt, Soft82.com, Download.hr, CompletelyfreeSoftware.com and Other Websites that post a blog regarding WinBubble...

Related Articles:

Unlocking WinBubble Part 1 *Tips and Tweaks

Unlocking WinBubble Part 2 *Icon Customizations

Unlocking WinBubble Part 3 *Securing your desktop

Unlocking WinBubble Part 4 *Screensaver Customizations

Unlocking WinBubble Part 5 *Optimize your Windows Vista Experience

Unlocking WinBubble Part 6 *More Security options

Unlocking WinBubble Part 7 *Miscellaneous Tweaks

Unlocking WinBubble Part 8 *Customizing Windows Vista Icons easily

How To Create your own Tweaking Tool Box

Ways to Tweak your Network and Internet Connections - Part 1

Tweak your Network and Internet Connections - Part 2

Tuesday, February 5, 2008

Pirates: We've Got Your Game

As part of a comprehensive effort to battle piracy of its products, Microsoft increased the efforts against piracy and carry out new steps to protect Windows Vista from ongoing and known counterfeiting threats. Windows Vista Service Pack 1 includes updates that deal with two exploits:

  • The OEM Bios exploit, which mimic a type of product activation performed on copies of Windows by OEMs.
  • The Grace Timer exploit, which attempts to reset or extend the “grace time” limit like the year 2099.

Source: Microsoft.com

To read more and download the notable changes made in Windows Vista Service Pack 1: Important Changes to Windows Vista Service Pack 1

Important Changes to Windows Vista Service Pack 1

At last! Windows Vista Service Pack 1 will be release soon. Recently, Microsoft released a documentation regarding the notable changes made to Windows Vista.

Download Here: Notable changes in Windows Vista SP1.pdf

Overview

SP1 will contain changes focused on addressing specific reliability, performance, and compatibility issues, supporting new types of hardware, and adding support for several emerging standards.

Service Pack Size

  Usage Download Size
Standalone Package

PCs without internet access
System administrators

About 450 MB (5 Language package)
About 550 MB (Full 36 language package)
Windows Update

Most home users
Many business customers

About 65 MB

This is great! Most home and small business users will receive SP1 thru Windows Update and the download size will result approximately 65MB only.

GOOD NEWS: SP1 reduces the number of UAC (User Account Control) prompts from 4 to 1 when creating or renaming a folder at a protected location.

PERFORMANCE AND POWER CONSUMPTION IMPROVEMENTS

  • About 20-25% of these improvements will be released separately via Windows update, prior to Windows Vista SP1.
    Improves the performance of browsing network file shares by consuming less bandwidth.
  • Improves power consumption when the display is not changing by allowing the processor to remain in its sleep state which consumes less energy.
  • Addresses the problem of the Video chipset (VSync interrupt) not allowing the system to stay asleep.
  • Improves power consumption and battery life by addressing an issue that causes a hard disk to continue spinning when it should spin down, in certain circumstances.
  • Improves the speed of adding and extracting files to and from a compressed (zipped) folder.
  • Significantly improves the speed of moving a directory with many files underneath.
  • Improves performance while copying files using BITS (Background Intelligent Transfer Service).
  • Improves performance over Windows Vista’s current performance across the following scenarios:
    -25% faster when copying files locally on the same disk on the same machine 
    -45% faster when copying files from a remote non-Windows Vista system to a SP1 system 
    -50% faster when copying files from a remote SP1 system to a local SP1 system
  • Improves responsiveness when doing many kinds of file or media manipulations. For example, with Windows Vista today, copying files after deleting a different set of files can make the copy operation take longer than needed. In SP1, the file copy time is the same as if no files were initially deleted.
  • Improves the copy progress estimation when copying files within Windows Explorer to about two seconds.
  • Improves the time to read large images by approximately 50%.
  • Improves IE performance on certain Jscript intensive websites, bringing performance in line with previous IE releases.
  • Addresses a problem that caused a delay of up to 5 minutes after boot with specific ReadyDrive capable hard drives.
  • Improves the effectiveness of a Windows ReadyBoost™ device in reducing the time to resume from standby and hibernate by increasing the amount of data stored in the ReadyBoost device that can be used during a resume cycle.
  • Includes improvements to Windows Superfetch™ that help to further improve resume times, in many environments.
  • In specific scenarios, SP1 reduces the shutdown time by a few seconds by improving the Windows Vista utility designed to sync a mobile device.
  • Improves the time to resume from standby for a certain class of USB Hubs by approximately 18%.
  • Improves network connection scenarios by updating the logic that auto selects which network interface to use (e.g., should a laptop use wireless or wired networking when both are available).
  • Improves the performance of the user login experience on corporate PCs outside of corporate environments (e.g., a corporate laptop taken home for the evening), making it comparable with PCs within the corporate environment. 
  • Reduces the time it takes to return to the user’s session when using the Photo screensaver, making it comparable to other screensavers.
  • Removes the delay that sometimes occurs when a user unlocks their PC.
  • Improves overall media performance by reducing many glitches.
  • In SP1, PC administrators are able to modify the network throttling index value for the MMCSS (Multimedia Class Scheduling Service), allowing them to determine the appropriate balance between network performance and audio/video playback quality.
  • Windows Vista SP1 includes a new compression algorithm for the RDP (Remote Desktop Protocol) that helps reduce network bandwidth required to send bitmaps or images via RDP. The compression, which can be selected by administrators via Group Policy settings, is transparent to all RDP traffic, and typically reduces the size of the RDP stream by as much as 25-60%, based on preliminary test results.

HARDWARE ECOSYSTEM SUPPORT & ENHANCEMENTS

  • Adds support for creating a single DVD media that boots on PCs with either BIOS or EFI.
  • Enhances support for high density drives by adding new icons and labels that will identify HD-DVD and Blu-ray Drives as high density drives.
  • Adds support for Direct3D® 10.1, enabling 3D application and game developers to make more complete and efficient use of the upcoming generations of graphics hardware.
  • Adds support for exFAT, a new file system supporting larger overall capacity and larger files, which will be used in Flash memory storage and consumer devices.
  • Adds support for SD Advanced DMA (ADMA) on compliant SD standard host controllers. This new transfer mechanism, which is expected to be supported in SD controllers soon, will improve transfer performance and decrease CPU utilization.
  • And many more...

DESKTOP ADMINISTRATION & MANAGEMENT

  • Allows users and administrators to control which volumes the disk defragmenter runs on.
  • Allows users and administrators using Network Diagnostics to solve the most common file sharing problems, not just network connection problems.
  • Windows Vista SP1 includes a new Security Policy (UAC: Allow UAccess), which allows applications to prompt for elevation without using the secure desktop. This allows a remote helper to enter administrative credentials during a Remote Assistance session.
  • And many more...

SUPPORT FOR NEW TECHNOLOGIES & STANDARDS

  • Adds full support for the latest IEEE draft of 802.11n wireless networking.
  • Enhances Windows Firewall and IPsec to use the new cryptographic algorithms that are Suite B compliant.
  • Updated drivers are delivered primarily via Windows Update and directly from hardware vendors, not as part of a service pack. However, a small number of critical drivers are included as part of Windows Vista (e.g., display drivers, audio drivers) and some of these have been updated.
    DESKTOP

APPLICATION COMPATIBILITY IMPROVEMENTS

Microsoft has already released several application compatibility updates which will allow more applications to work seamlessly for the end user. These will appear in SP1, but are also available via Windows Update.

RELIABILITY IMPROVEMENTS

Reliability improvements vary from PC to PC based on hardware, environment, and usage. Customers will experience varying levels of benefit. SP1 addresses issues many of the most common causes of crashes and hangs in Windows Vista, as reported by Windows Error Reporting. These include issues relating to Windows Calendar, Windows Media Player, and a number of drivers included with Windows.

SECURITY IMPROVEMENTS

  • Windows Vista SP1 includes all previously released Security Bulletin fixes which affect Windows Vista.
  • SP1 includes Secure Development Lifecycle process updates, where Microsoft identifies the root cause of each security bulletin and improves our internal tools to eliminate code patterns that could lead to future vulnerabilities.
  • Service Pack 1 includes supported APIs by which third-party security and malicious software detection applications can work alongside Kernel Patch Protection on 64-bit versions of Windows Vista. These APIs have been designed to help security and non-security ISVs develop software that extends the functionality of the Windows kernel on 64-bit systems, in a documented and supported manner, and without disabling or weakening the protection offered by Kernel Patch Protection.
  • Improves the security of running RemoteApp™ programs and desktops by allowing RDP files to be signed. Administrators now have the control to differentiate the user experience based on the publisher's identity.
  • Data Execution Protection (DEP) is a memory-protection feature available beginning with Windows XP and Server 2003. SP1 improves security with a new set of Win32 APIs to allow programmatic control over a process’s DEP policy. This will provide application developers with finer control on a process’s DEP settings for security, testability, compatibility, and reliability.
  • And many more...

Related Articles

Pirates: We've Got Your Game

UnlockMe! Hardware Problem After Installation of Windows Vista Service Pack 1

Installing Windows Vista Service Pack 1

Sunday, February 3, 2008

Ways to Tweak your Network and Internet Connections - Part 1

There are many ways to improve and speed up your Internet Connections: upgrade your Internet access service to a much bigger bandwidth which speeds up everything, find a provider nearest you (DSL lines), change your networking equipment, and by performing some tweaks that offer ways to potentially enhance your network connections in Windows Vista.

DNS (Domain Name Server), A Software running on a web server, that handles translation of domain names [www.UnlockForUs.Blogspot.com] into IP addresses [72.14.207.191].

1. Ultimate DNS Tweak: Use OpenDNS

Free yourself of DNS-related Internet problems. Ultimately, speed up your Internet surfing!

When we type www.unlockforus.blogspot.com [domain name] in the web address, local ISP DNS servers translate that into an IP address [72.14.207.191]. There is a possibility that this is the main reason for slow Internet access. Thus, changing your DNS server addresses to a more reliable but free service called OpenDNS is recommended!

 set

How? Open the Control Panel > Network and Sharing Center, On the Left-side portion, click Manage Network Connections > Right-click the Network adapter > Status > Properties > Internet Protocol Version 4 > Properties > Click "Use the following DNS server addresses:" and enter the values shown above. That's it!

Note: In some cases, these settings will remove your Internet connections  after reboot. You need to remove the DNS setting to restore you're Internet connections.

2. Disable Failed DNS Caching and Clear the DNS Cache

DNS problems may stop you from being able to visit Web sites. Sometimes due to Negative entries, DNS lookups failed to connect to websites.

a. Disabling failed DNS caching, Windows will not cache failed DNS lookups. It will go back and reload web pages that might have been only temporarily unavailable.

WinBubble

HOW-TO:

  1. Use WinBubble, In just two clicks it will Disable Failed DNS Caching.  Go to Miscellaneous Tweaks Tab > Check "Disable Failed DNS Caching" > Click the Apply Button.
  2. Manually apply the registry trick, : Open the Regedit > Go to
    HKEY_LOCAL_MACHINE\SYSTEM\CurrentControlSet\Services\Dnscache\Parameters > Right-click in the Parameter registry folder, and then select New > DWORD Value, Name it NetFailureCacheTime, and then press Enter. Create another two entries called NegativeSOACacheTime and MaxNegativeCacheTtl, verify if their value is 0 and 
    Reboot your PC.
    Note: To restore, just delete the three entries and reboot your computer.

b. Flushing the DNS cache
DNS entries are cached for faster lookup. But Sometimes, you need to clear these especially when you did not disable failed DNS caching. Your other option is to wait until it expires and flushes the entry automatically, which typically takes about 24 hours. Anyway, If you've cleared this cache, your system will run in a clean sheet.

To clear the DNS cache: 
1. Open a command prompt window as Administrator.
2. Type ipconfig /flushDNS

To display entries in DNS cache:  ipconfig /displaydns

If you're a forgetful person and you don't want to memorize these things, use Winbubble and create a tool:

usingWinBubbletools

Here:  How to Create your Own Tweaking ToolBox

NEXT:

Tweak your Network and Internet Connections - Part 2

TCP (Transmission Control Protocol) is one of the most important protocols of the Internet. It provides effective and reliable ways in transferring a data, making it suitable for applications like surfing the World Wide Web, file transfer and sending e-mail.

According to Microsoft, "WinInet limits the number of simultaneous connections that it makes to a single HTTP server. If you exceed this limit, the requests block until one of the current connections has completed. This is by design and is in agreement with the HTTP specification and industry standards."

Speed me up! I don't want to follow that agreement

IncreaseBW

Using WinBubble: Go to Optimize Tab > Check the option "Increase the bandwidth for Network and Internet Connections"... That's it! Don't forget to click the Apply Button.

How-To Change the settings manually:

HKEY_CURRENT_USER\Software\Microsoft\Windows\CurrentVersion\Internet Settings
DWORD: MaxConnectionsPerServer
DWORD: MaxConnectionsPer1_0
For both, you can set a value of 10 to have a maximum of ten connections per server. WOW!

simultaneous

PREVIOUS:

Saturday, February 2, 2008

The Tweaking Toolbox

If you downloaded a useful freeware application but you do not use it frequently, your desktop is full of icons and basically, you don't want to memorize lots of commands. WinBubble Toolbox is great for you!

ToolScreenshot

LATEST Update:

TweakingToolBox

Now supports .reg, .vbs and ANY FILES that can be launch through Windows Explorer. Even your Picture! Download WinBubble Now!

Quick Guide:

  1. For portable applications (.exe files): Open WinBubble > Specific Tab > Click 'Add your Tools here' button > locate and open the file > then, type any name.
  2. For those applications/Maintenance tools with parameters or switches, just create a batch file (.bat files) and select the 'batch files' option when loading the file in WinBubble.
  3. If you want to open vbScript files, simply execute the script file inside the batch file.

Example: "Display DNS Cache" Button Step-by-Step Guide:

1. Open the notepad, copy and paste the text below:

@Echo off
echo My Tool will Display DNS entries...
ipconfig /displaydns
pause

2. Save the file in any folder that you want and choose any filename with a file extension of .bat (example: displaydns.bat)

savebat

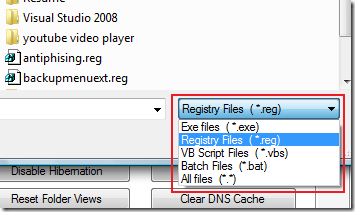
3. Open WinBubble > Specific Tab > Click Add your Tools here. In the Open Dialog, go to the folder where displaydns.bat is located, click the Combo Box and choose Batch Files.

 addbatchfiles
4. Finally, Click the Open button and type any Name that you want.

Example 2: Adding WinGuggle, Recover your product key easily

1. Open WinBubble > Specific Tab > Click 'Add your Tools here' button > locate and open the file

2. Input the name

name

That's it, Enjoy!