Sunday, June 29, 2008

[Vista/XP] How to Customize your OEM Information

Did you ever wonder how HP, DELL, SONY, ASUS, FUJITSU , ACER, LENOVO laptops and PC's put their Logo and information to your System Properties?

Branding your Windows XP was easy. You can Add, modify and change it's Original Equipment Manufacturer settings by only modifying two files. When Windows Vista came, It needs you to modify some registry settings that you need to memorize all the keys and it is not advisable for Beginners. Solution: Now you can do it in just two clicks or If you feel that it's better to do it manually, No Problem!

Here's How...


Using a Software to Add or Change it in just Two Clicks!

Using the Latest version of WinGuggle that works with Windows XP and Vista. You can experiment with it... It's easy!

screenshot

What's the cool thing about WinGuggle? It automatically backs-up your OEM Information, If you have it by default. If not, you will be ask, if you want to back-up the logo and information as default or not. And later If you want to reset and restore the original settings, Just Click the "Reset to Default" Button. That's it!

NOTE:

Logo Specification: 256-colour bitmap file (.BMP) about 180 wide x 120 high

For Windows 7 - Read here

Windows Vista

A Complete guide in Customizing your Welcome Screen and System Window: Branding your Windows Vista Computer

Do it Manually: Don't worry Geeks, here:

Customizing OEM Logo in Windows Vista

Windows XP

Ok, it seems this is old but still many users don't know much about it.

Add or Change it Manually

1. Go to Windows\System32 Folder > find OEMinfo.ini and OEMLogo.bmp

2. Modify OEMinfo.ini using the format below:

[General]
Manufacturer=Dell Inc.
Model=Latitude D630

[Support Information]
Line1=
UnlockForUs, Lawrence Albert
Line2=
Line3=
HTTP://UnlockForUs.blogspot.com
Line4=Please Visit my website... Thank you very much!
Line5=
Line6=

3. If you can't find the file, Open the notepad > Paste the Information above and just change it > Save the file as OEMInfo.ini

4. Open OEMlogo.bmp in Paint or any Graphics editor and Paste the Picture that you want.

5. If you can't find the file, Just create a 256-colour bitmap file (.BMP) about 180 wide x 120 high and save it as OEMlogo.bmp to Windows\System32 Folder. Anyway, there is no problem if the picture is large. It will be cropped automatically.

Enjoy!!!

More Articles:

Unlock ME! "Hidden Windows XP Serial Key"

UnlockForMe! "Access denied", opening a folder in Windows Vista/XP

UnlockMe! Hide your computer in the Network

Unlock for Us: Windows Vista Unlocks, News, Tips and Tweaks

Friday, June 27, 2008

Quick Tip: Simplest way to Save Time in using Google Search

savetime

This is the first Google Tip that I wrote and a must to share with everybody.

As stated in the picture above. Save time by hitting the Return or Enter Key instead of Clicking the "Search" Button - Google.

That's it!

Simple right? :)


More Articles:

Unlock for Us: Windows Vista Unlocks, News, Tips and Tweaks

Fun Stuff! Hack your Windows Experience Index (WEI) score

Turn Off Aero using a Keyboard Shortcut

Wednesday, June 25, 2008

[Vista/XP] Launch and Run Programs during Startup

windows Windows Vista Security (User Account Control, UAC) was designed to block  programs that needs elevation or Administrator's approval which makes it very difficult for malicious programs to run during the startup. Anyway, There are several ways to configure, enable and Add programs to launch after the logon or startup process.

How?

A. Force the program to start and Bypass UAC using the Task Scheduler in Windows Vista

1. Open the Task Scheduler using that Start Search > Type "task"...

2. Click Create Task located at the right side.

3. Type the name of the program and Click "Run with highest privileges" option

4. Go to Actions Tab and click the New Button

5. Click the Browse button and locate the program to be launch during startup. To add another program, just click the New Button and repeat #5

6. Finally, Click the OK Button and Reboot your Computer. That's it!

Note: After Reboot, Windows Vista will display a warning message "Windows has blocked some startup programs". To solve this issue, Click the Blocked startup programs icon > Choose Run blocked program > click the program in the list.

B. Using the Registry

Go to the Path  below:

Current Logon User
HKEY_CURRENT_USER\Software\Microsoft\Windows\CurrentVersion\Run 

All Users
HKEY_LOCAL_MACHINE\SOFTWARE\Microsoft\Windows\CurrentVersion\Run

Right-Click > New String Value > Name of the Program or Any name > Double Click and Enter the path of the program in the Value Data.

Runce Once the Program during Start-up

HKEY_LOCAL_MACHINE\SOFTWARE\Microsoft\Windows\CurrentVersion\RunOnce

HKEY_CURRENT_USER\Software\Microsoft\Windows\CurrentVersion\RunOnce

C. Easiest way: Using Startup Folder

Simply put the shortcut into the Startup Folder in the Start Menu

Start Menu > All Programs > Right-Click > Open or Explore > Just Drag the Shortcut on the folder

Works with Windows XP/2000. In Windows Vista, Use this only if the program doesn't require elevation.

To Launch the program in All users in Windows Vista:

Start Menu > All Programs > Right-Click > Open All Users or Explore All Users > Just Drag the Shortcut into the folder

Enjoy Learning Windows!!!

Related Articles:

How to Remove/Disable Start-up programs in Windows Vista

UnlockMe! "Windows has blocked some startup programs"

"Access denied", opening a file/folder in Windows Vista/XP

Sunday, June 22, 2008

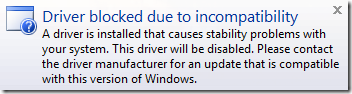
The Most Annoying message next to UAC: "This Driver is Blocked Due to Compatibility Issues"

program compatability issues

This is the most annoying message that I ever encountered in Windows Vista. Every time I boot my computer it always give the message, And you can't stop it easily!

Driver: Sonic Solutions DLA
Publisher: Sonic Solutions

It seems that tons of people have had this problem with Roxio. This old problem started after the release of Windows Vista but until now (Windows Vista Service Pack 1), it still exists! (Lenovo / IBM ThinkPad , HP, DELL, and other computer and laptop manufacturer)

driverblock2

"Yes I know, Leave me alone!"

THE DRIVER PROBLEM IS CAUSED BY OTHER DRIVERS

This is the most difficult one. Some Device Manufacturer's are too lazy to update their drivers.

SOLUTION

There is no quick solution to the problem. Anyway, here's my tip: Go to the Manufacturer's Website and find the patch or fix. If you can't find it, uninstall everything or RESOLVE the problem using Windows System Restore.

Prevention Tip: Before installing any device or software Create a restore point and Add "Create a Restore Point" to your Context Menu 

The Most Popular ROXIO PROBLEM

Most of them are DELL laptops and computers pre-installed with ROXIO which is cause by Roxio drag-to disc software that has a compatibility issue even in Windows Vista Service Pack 1.

Thankfully, Roxio released a patch regarding the problem and my problem was fixed. here:

DLA driver blocked on Vista launch

If your problem still continues... Try the update through DELL Technical Support

Dell Technical Support

"Microsoft Windows Vista may report that Sonic® Drive Letter Access or Roxio® Drag-to-Disc is incompatible. However, an update is now available to resolve this error. - DELL"

Last Resort: The Simplest Solution? Download the latest software of Drag-to Disc from Roxio Site (15.1mb) and just follow the instructions while installing the latest update:
http://docs.roxio.com/patches/d2d3290.exe

That's it! I hope this helps...


More Articles:

"Access denied", opening a folder in Windows Vista

"Windows can't verify the publisher of this driver"

UnlockMe! "Windows has blocked some startup programs"

Saturday, June 21, 2008

Best Free Software's For Windows

windows Great News Guys! My two software Winbubble and Winguggle was added to this Great list of software by Calvin. His list of Software's are great and most of them are useful. When I got a problem and dilemma about WinBubble, He always there to encourage and try to answers every questions I ask. So what's the result? It was awesome! Most of his suggestions rocks! Better Visit and Ask him now. Enjoy and Don't forget to create a restore point first or else it might damage your PC. JOKE :D

Enjoy Learning Windows!


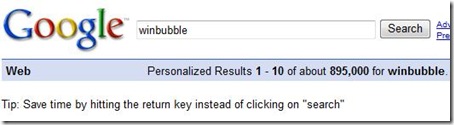
BREAKING NEWS: WinBubble already reached it's peak! 1,110,000+++ Google results! I will now declare WinBubble 1.73 as the most popular version of WinBubble.


Read More:

FREE PHP and MySQL Hosting, Web Hosting For Everyone!

"Access is denied", opening a folder in Windows Vista/XP
Unlock for Us: Windows Vista Unlocks, News, Tips and Tweaks

Thursday, June 19, 2008

Add "Remove Temp Files" to Right-Click Menu

Clear and erase your Temporary Files Easily

Free-up more space in your Hard drive! After Reading some questions on How to Clean / Remove temporary files manually in Windows Vista and XP. Thankfully, Something pops-up in my head, If I will create a small program or script and be able to delete the temporary files in just one click, That would be Great!

Command For Clearing Internet Explorer Temp Files, Click here

Delete %Temp% files and folders (User Temp Folder), and Windows Temp Folder in Windows Vista

If WScript.Arguments.Count > 0 Then
Set objApp = CreateObject("WScript.Shell")
objApp.Run "cmd.exe /c " & Chr(34) & "rmdir /S /Q %temp%" & Chr(34)
objApp.Run "cmd.exe /c " & Chr(34) & "rmdir /S /Q %SystemRoot%\temp" & Chr(34)
Else
Set objLaunch = CreateObject("Shell.Application")
objLaunch.ShellExecute "wscript.exe", Chr(34) & WScript.ScriptFullName & Chr(34) & " RunAsAdmin", , "runas", 1
End If

Open Notepad > Just Copy and Paste the Code Above and Save the the file to Any filename that you want with extension ".vbs"

e.g. deltempfiles.vbs

Or If you're afraid to commit a mistake, just Download the files,

Vb Script Files To Remove Temp Files

Adding the Script to Context Menu:

1. Download WinBubble

2. If you prefer to manually add the entry to Computer, Desktop, Start Menu, Folders Context Menu, Read here:

Adding your applications to Context Menu (Right-Click Menu)

3. Using WinBubble:

Go to Miscellaneous Tab > Click the Computer Button > Type Any Name. In this guide, let's try "Remove Temp Files" > Click the Browse Button and locate the VB Script File > Add wscript.exe before the path and enclosed the path in a quotation mark (").

Name: Remove Temp Files

Command: wscript.exe "C:\Tools\deltempfiles.vbs"

Click the Add Button. That's it!

Deleting %Temp% Folder Files Only

C:\Users\[UserName]\AppData\Local\Temp

If you want to clear the User's temporary Folder only because UAC will not prompt to elevate the command:

Repeat the steps from 1 to 3 and use the script below:

Set objApp = CreateObject("WScript.Shell")
objApp.Run "cmd.exe /c " & Chr(34) & "rmdir /S /Q %temp%" & Chr(34)

Download: VbScript Files To Clean your Temp Files

Also, you can use this to clear your Personal Temp Folder when Windows Starts. Just drag the Shortcut to Start Menu > All Programs > Start Up Folder.

That's it!

Want to learn How it was created?

Read this first:

How to Run VBScripts as Administrator in Windows Vista

Enjoy!!!

More Articles:

[Vista] Hibernate Button is gone

Windows Vista SP1 File Removal tool: Free up more space on your hard drive

Internet Explorer Command to Delete Temporary Files, All History, Passwords and Forms

Google Chrome Temporary Files location (Cache), Bookmarks/Favorites Database Hack!

Friday, June 13, 2008

Hacking WinBubble: Customizing the Restore Point Creator designed for Windows Vista

RestorePointAfter posting the article about adding "Create a Restore Point" to your Context Menu. Some Users requested on how to create a Shortcut for the tool, use a Shortcut Key for launching the command and changing the restore point name.

Here's what you want guys... Hack WinBubble!


Creating a shortcut to desktop

1. Download WinBubble and Extract the zip file.

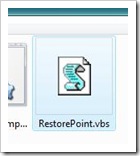
2. Open the "Tools" folder and locate RestorePoint.vbs as shown in the picture above.

3. Create a Shortcut to your desktop: Right-Click > Send to menu > Desktop (create Shortcut). That's it!

Shortcut Key to Create a Restore Point

Drag it to your Quick Launch Taskbar and use Win+Icon Position to launch the script e.g. Win+1, Win+5...Win+9

Changing the Restore Point Name:hackingwinbubble

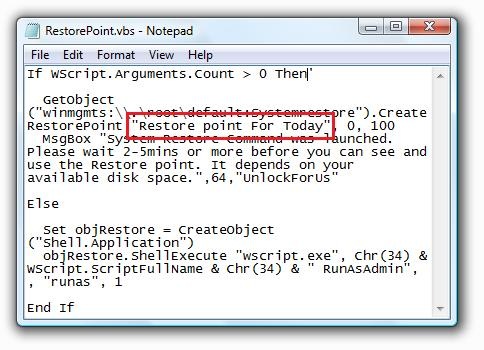
1. Go to "Tools" folder and open RestorePoint.vbs in notepad: Right-click > Edit

2. Just change the Restore point name "Restore point for Today" to any name that you want, example: "Software's installed for testing"

Learn and have a clue on how it was created in Windows Vista? Read this first.

How to Run VBScripts as Administrator in Windows Vista

Enjoy Learning Windows!