Friday, May 8, 2009

RegDevelop Hidden Features

Every software created by famous companies has its own secrets. RegDevelop will include some hidden features that will make your User Experience better.

hidden features

For now, It’s few but maybe you can use them in your applications.

Monitor Off Button

monitoroff

Open CD Command Button

open

Close CD Command Button

closecs

Enjoy!!!

I would like to ask all of you to share some ideas that can be added to the application. You can join my group here or email me at unlockforme@gmail.com Thanks :)

RegDevelop Part 2 – Using Button, Label and PictureBox Controls

Previous | NEXT: CheckBox and TextBox Control

Button Control – this control will let you launch other programs and use command line applications including scripts and batch files. It’s like launching another program using the “Run” Window.

Launching About Windows

UserInfoButton PropUserInfoButton

Launching System Window

OEMinfoButton propOEMinfoButton

Backup Button Example

backupbutton propbackupbutton

If the WindowStyle Property was set to Hidden, the command prompt will not be seen.

Enable and Disable UAC

EnableDisableUACParameters are long? No problem.

Enable UAC StartProcess Property

C:\Windows\System32\cmd.exe /k %windir%\System32\reg.exe ADD HKLM\SOFTWARE\Microsoft\Windows\CurrentVersion\Policies\System /v EnableLUA /t REG_DWORD /d 1 /f

Disable UAC StartProcess Property

C:\Windows\System32\cmd.exe /k %windir%\System32\reg.exe ADD HKLM\SOFTWARE\Microsoft\Windows\CurrentVersion\Policies\System /v EnableLUA /t REG_DWORD /d 0 /f

and set WindowStyle Property of both Button to Hidden

More Examples:

RegDevelop Hidden Features

How to Customize or Change the Welcome Screen Background in Windows 7

Coming Soon…

____________________________________________________

Label Control – this is only use to add information like titles, names, heading and others.

label proplabel

_____________________________________________________

PictureBox Control – There are two modes in this control:

Reminder: You can only use one mode at a time.

Mode 1 - Enables you to read and change the image path save in the Registry. Note: If there’s a setting in Mode 2, Remove it first.

Similarities of Between the Registry and RegDevelop

registry

Example: Changing the Original Manufacturers Logo in Vista

DELL_BADGE

RegDevelop PictureBox Property

RegPath

HKEY_LOCAL_MACHINE\SOFTWARE\Microsoft\Windows\CurrentVersion\OEMInformation

ValueName logo
ValueType string

Mode 2 – Open the image from a specified location for viewing purposes only or viewing and ability to change the image file.

NEXT: CheckBox and TextBox Control

RegDevelop Part 3 – Using CheckBox and TextBox Controls

CheckBox Control – this control lets you create a Graphical User Interface to Windows Registry. The current version supports DWORD and String values.

Registry Editor and RegDevelop Checkbox Control Similarity

Registry

RegistrycheckBox

CheckBox Control

propcheckbox

CHECKED Group – This is the settings to be Read and Write if the checkbox control was tick or click to check.

DisableRegEditCheck

UNCHECKED Group – This is the settings to be Read and Write if the checkbox control was click to uncheck.

DisableRegEditUnCheck 

The Note will be your guide while creating an application.

If the Subkey or Value name doesn’t exist originally, then we can say that it should be deleted while unchecked. However, if the checkbox control was designed to create new registry value name and it should not be deleted upon unchecked, then you have an option for that also. Just Choose DeleteWhenUnchecked Property to False.

The SubKey or Value Name exists originally – In this situation we can say that it should not be deleted. However, there are times for example we want to create an application that will fix or remove some settings (e.g. settings made by viruses), then you have an option to delete the setting. Just Choose DeleteWhenUnchecked Property to True.

Value Name doesn’t exist

It means that in your computer, the registry value name doesn’t exist.

The Subkey doesn’t exist

It means that in your computer, the registry sub key doesn’t exist.

Simple Examples that will help you Design your own Customization Applications

1. Open with Notepad – this is very useful in everyday use of computer. Most of the time you want to take a peek on the files in your PC. This simple function is great for you!

OpenWithNotepad

RegDevelop Settings

OpenWithNotepad 

Please drag the CheckBox Control and add the following properties.

Caption Open with Notepad
RegKeyPath1 HKEY_CLASSES_ROOT\*\shell\Open with Notepad\command
Value_Name1 (Default)
ValueData1 notepad %1
ValueType1 String
DeleteWhenUnchecked True


2. Disabling USB Drive – Take control of your flash drive. This useful security feature needs log-off or reboot after changing the setting.

DisableUSBDrive

Drag the CheckBox Control and Set the following properties.

Caption

Disable USB Drive

RegKeyPath1

HKEY_LOCAL_MACHINE\SYSTEM\CurrentControlSet\Services\USBSTOR

Value_Name1 Start
ValueData1 4
ValueType1 DWORD
DeleteWhenUnchecked False

RegKeyPath2, Value_Name2, ValueData2 and ValueType2 properties will be filled is automatically.


3. Restore Previously Opened folder after Re-Boot 

- this is useful if you are working on something and you want to launch the folder window again during the startup / logon.

RestorePreviouslyOpenedFolder

Please drag the CheckBox Control and input the following properties.

Caption

Restore the previously opened Folder after reboot

RegKeyPath1

HKEY_CURRENT_USER\Software\Microsoft\Windows\CurrentVersion\Explorer\Advanced

Value_Name1 PersistBrowsers
ValueData1 1
ValueType1 DWORD
DeleteWhenUnchecked False

RegKeyPath2, Value_Name2, ValueData2 and ValueType2 properties will be filled is automatically.

It is recommended to practice and Read more:

[Easy Fix] Enabling Registry Editor

How to Customize or Change the Welcome Screen Background in Windows 7

_________________________________________________________

TextBox Control – this control allows you to create a User Interface in reading and writing string type value data to the Registry.

From the my previous tip: Add Greetings, Reminders Or Any Message after boot or switching to another user

MessagebeforeEnteringWindows

Caption TextBox Control

RegKeyPath

HKEY_LOCAL_MACHINE\SOFTWARE\Microsoft\Windows\CurrentVersion\Policies\System

ValueName legalnoticecaption
ValueType String

Message TextBox Control

RegKeyPath

HKEY_LOCAL_MACHINE\SOFTWARE\Microsoft\Windows\CurrentVersion\Policies\System

ValueName

legalnoticetext

ValueType is set to String

That’s it.

Cool Right? Enjoy!

RegDevelop Guides

RegDevelop 1 – Introduction and Screenshots

RegDevelop Part 2 – Using Button, Label and PictureBox Controls

RegDevelop Part 3 – Using CheckBox and TextBox Controls

Simple Portable Drive Scanner

screenshot

Even if Anti-Virus Companies already optimized and tweak their Software, Still it consumes more resources than any software installed in your PC. Why? It’s running all the time. When you add them all… That is Huge!

If you have a 4-8 years old PC and rarely connected to the Internet. Just Uninstall All your Anti-Virus Software and create an application that will scan a Drive If needed.

This is also useful for Maintenance Purposes…

DISCLAIMER NOTICE: By reading this Article and using RegDevelop Software, All Programs from other manufacturer that will be added must follow the guidelines and terms of each Software Manufacturer. If you do not Agree, do not read and use the article below.

1. Download, Extract and Open RegDevelop > Drag the Button Control

properties

Change the Button Text to any name that you want.

2. In this example we will use the good old McAfee Command Line Tool.

Open and Download the latest SuperDAT:

ftp://ftp.nai.com/pub/antivirus/superdat/intel/

3. Create a New Folder (e.g. sDAT) inside the Tools folder of RegDevelop > Copy the SuperDAT File (sdat????.exe) inside.

Superdat

4. Extracting the File: “[path]\sdat????.exe” /e

In Windows Vista / Windows 7, Right-Click + Shift Key > Copy as Path > Press Win+R for Run Window > Right-Click and Paste > add /e to Extract

RunWindow

For Windows XP, Start Menu > Run > and use the syntax above

To Check, Open SuperDAT.txt inside the folder:

Message while extracting:

Uncompressing all files into C:\ReDevelop\tools\sDAT

Wait for these message:

Zip file extraction is successful.

5. You can now delete the original file.

6. Let’s go back to RegDevelop window and change the StartProcess property of the Button Control:

SYNTAX: tools\SDAT\scan /clean /all [drive letter]:

Example: tools\SDAT\scan /clean /all e:

If you have some background in DOS > Open CMD > go to the directory cd “[folder directory]” > customize the parameters by studying them first: scan /?

Button Properties

StartProcess tools\SDAT\scan /clean /all e:
Caption Any name

To Test: Click the Start Button and click the created button

scanning

7. You can also add some of the free tools by McAfee such as Stinger (Works in Vista and XP) and RootKit Detective (doesn’t work in Vista) using the same procedure.

Button Properties

StartProcess tools\Stinger\Stinger.exe
Caption Any name

8. If your a geek and experienced user I suggest to add the famous tool for Malware Detection HijackThis Executable. This tool is powerful for startup detection and other settings.

Button Properties

StartProcess tools\HijackThis\HiJackThis.exe
Caption Any name

9. To add more useful programs, download the Spyware and Adware Removal Program called SpyBot Search & Destroy.

Making it Portable: Install the Application and Copy the files in “C:\Program Files\Spybot - Search & Destroy” to [RegDevelop Folder]\tools\SpyBotSD\ folder

Note: Make sure to unhide the files first (Tools > Folder Option > View Tab > Uncheck “Hide Protected operating system files”

Button Properties

StartProcess tools\SpyBotSD\spybotsd.exe
Caption Any name

That’s it!

Sample Screenshot

screenshot

Enjoy!

Wednesday, May 6, 2009

How to Customize or Change the Welcome Screen Background in Windows 7

welcomescreendesigner 

At last! Microsoft allowed and added the feature that lets you change the Logon Background in Windows 7 easily…. Using the Registry or Group Policy Editor, You can now activate function.

Third-Party Software:
smallversion

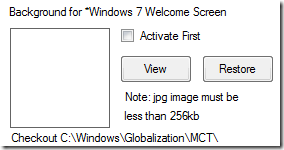
WinBubbles Lite 2009 includes a small version that will customize your Welcome screen easily in Windows 7. Just Click the PictureBox to Change, Click to Checked the “Activate First” option and press Alt-A. That’s it!

It was created using RegDevelop, like the screenshot above.

Geek Way:

Activation via Group Policy Editor Setting:

regedit

We will notice that it uses UseOEMBackground Value Name

Registry Key: HKEY_LOCAL_MACHINE\Software\Policies\Microsoft\Windows\System

Just Add and Set the Value Name to 1 (DWORD)

If your Windows Directory is C:\Windows, Add/Put a jpeg file here:

C:\Windows\System32\oobe\info\backgrounds\backgroundDefault.jpg

The  image must be less than 256kb. Just resize your jpeg files using ms paint, Gimp or Photoshop.

TIP: Checkout C:\Windows\Globalization\MCT\ for high resolution and amazing backgrounds… it’s FREE!!!

Creating Your Own Customization Software for the Tip:

My latest software RegDevelop, which let’s you create a Customization Software that can be edited and shared by everybody does the job very well.

If you want to learn more about the software, I recommend this design

regdevelop

Now you can create a Program to change it Safe and automatically…

Anyway, Using RegDevelop needs practice. maybe after 2-3 examples, you can do it fast without instructions.

Designing The User Interface

1. Drag a PictureBox. It will correspond to the User Account Picture because it is located in front of other controls.

2. Drag a Label Control and TextBox and arrange it according to your taste (The two are just dummy, for UI design only). You can change the Caption of the Label to any name that you want.

3. Add a CheckBox and Two Button Control. Change the Caption of the Two Button (“View” and “Restore”)

4. Finally, Add the Big PictureBox that corresponds to the Welcome Screen Background.

Settings

PictureBox2 (The most important)

Mode 2: Open From File Location  
Image

C:\Windows\System32\oobe\info\backgrounds\backgroundDefault.jpg

PictureBoxStyle

View and Set

PictureBox1 (For User Account Picture only…)

Mode 2: Open From File Location  

Image

any Bitmap or try this:
C:\Users\[Username]\AppData\Local\Temp\[Username].bmp

PictureBoxStyle is set to View

CheckBox1 (Activation CheckBox Setting)

CHECKED

RegKeyPath1

HKEY_LOCAL_MACHINE\Software\Policies\Microsoft\Windows\System

ValueName1 UseOEMBackground
DataValue1 1
ValueType1 DWORD
DeleteWhenUnchecked True

Button1

Settings  
StartProcess rundll32.exe user32.dll, LockWorkStation
WindowStyle Normal
Caption View

Button2

Settings  
StartProcess {PictureBox2} /r
   
Caption Restore

{ControlName} /r – restore the backup when the program was opened for the first time to a specified Control (e.g. PictureBox2)

That’s it! You have created a Logo Changer Third Party Software For Windows 7.

Tiny but Powerful Rapid Application Development software right?

You can make any custom light weight versions that will focus on what you want and what you need.

You can read more here: RegDevelop Introduction and functions

Most of the Websites said Mr. Rafael of WithInWindows.com found the registry tip. The registry setting is different but Thanks and good job…

Enjoy!

Tuesday, May 5, 2009

[Easy Fix] Enabling Registry Editor

During Windows XP days, getting around viruses or simply worms are very difficult. They spread unnoticeable and fast. Each of them has different characteristics and forms of infection. One of the errors you might get is this:

message

“Registry editing has been disabled by your administrator.”

If I only knew that I can share what I know to all of you by blogging… Maybe I already helped thousands of users before.

Anyway, here’s a quick fix in Windows Vista, XP and Windows 7 (If possible) and also, for those who believed Knowledge is better:

1. Download and open my utility WinBubbles. Go to the Miscellaneous Tab. In this example, you will be able to learn and update Winbubble options.

Let’s type “Disable the Registry Editor”. why disable? later…

tweakertool1

Push the Create my Tweaker Button and add this values

tweakertool2

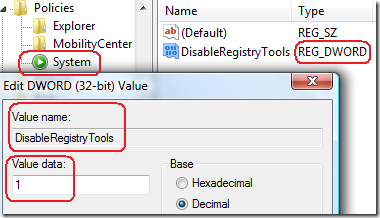
Registry Key Path: HKEY_CURRENT_USER\SOFTWARE\Microsoft\Windows\CurrentVersion\Policies\System\

Value Name: DisableRegistryTools

Lastly, Click the Set Button. that’s it… Easy right? That’s the great thing about Winbubbles… The beginning of all my ideas.

checked

Now, you’ll notice that It was checked… that’s the reason.

To Fix: Just Unchecked it and Click the Apply my Tweak Button.

What if it is unchecked? Maybe the virus or other software uses the HKEY_LOCAL_MACHINE registry hive… so please RESET and recreate again using the path below:

HKEY_LOCAL_MACHINE\SOFTWARE\Microsoft\Windows\CurrentVersion\Policies\System\

Great right? Enjoy!

Using RegDevelop

RegDevelop is my new software that lets you create your own Customization utility like WinBubbles. You can create a light weight version that will focus on what you want and what you need.

You can read more about the software here: RegDevelop Introduction and functions

Download RegDevelop, extract the zip file and launch regdevelop.exe

1. Drag the CheckBox Control into the form. Click and simply add the properties below.

regdevelopsettings

RegKeyPath1

HKEY_CURRENT_USER\SOFTWARE\Microsoft\Windows\CurrentVersion\Policies\System\

Caption Disable Registry Editor
 
Value_Name1 DisableRegistryTools
ValueData1 1
ValueType1 DWORD
DeleteWhenUnchecked True

2. You can try the program first by clicking Start Button but checkbox control is in sandbox mode. After the Stop Button, all settings will be restored like nothing happens. The settings by the virus will be restored.

Therefore, it’s better to click the Build Button.

buildbutton 

You can also add a Label to the application if you want.

regdevelop

Great Right?! That’s RegDevelop!

It’s NOT limited to checkboxes. There are many controls also and possible application that you can create, Works in Windows 7!

Please Stay Tuned! Thanks….

Monday, May 4, 2009

[Code 500] Downloading Windows 7 RC – Internal server error

Microsoft released the RC version of Windows 7 today to the public. However, due to its popularity and demand. error

We might need to wait and try again and again until we can download the new version.

500 – Internal server error.
There is a problem with the resource you are looking for, and it cannot be displayed.

After a few minutes…At last!!!

atlast

I waited for the Akamai Download manager but It didn’t appear.

Windows 7 RC Download Center

Please wait while the Download Manager begins your download.


If you have not already installed ActiveX control or the JavaTM applet, an information box will appear in your Microsoft Internet Explorer browser prompting you to install "ActiveX control:...".
If the Download Manager can not install the ActiveX control or the JavaTM applet in your browser, you may have system restrictions.
If you have system restrictions, please:
  • Download products using the Web Browser method
  • Contact your organization’s Administrator to download products using the Download Manager method

I tried for several times but it did not show up.

It seems the page automatically generates a new serial every time I refresh the page.

After 22 minutes…. YES!!!

DownloadingTime 

No doubt. Windows 7 now is the next generation of Operating system.

Its popularity is remarkable due to its speed, UI-design and amazing User Experience. And also the Hardware Requirements!

Microsoft focus: Less waiting and Fewer clicks

Anyway, about the Less complicated thing. I’m going to find out about it.

Please check out my new and growing list of Windows 7 Softwares and Tips and Tricks!

Especially my new Software RegDevelop! It lets you create Customization Software that can be updated by anybody.

Anyone! :)


NEW: [How-To] ANOTHER WAY TO DOWNLOAD WINDOWS 7 RC