Tuesday, October 18, 2011

Using RegDevelop to Create your own Hardware and System Information Program

Gathering of computer hardware and system information about the central processing unit (CPU), Memory Card (RAM), BIOS, motherboard, and other hardware peripherals are usually needed in many cases for hardware verification, driver installation and driver update.

hardware

Here’s a guide to create your own program using Regdevelop. All you need are commands use to get the hardware information.

How-to-do

Open the program and drag the button control and start configuring the settings.
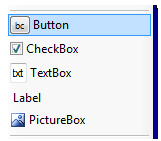
buttoncontrol

Sample Settings

settings

hardwareinfo

----------------------------------------------------------------

Caption

CPU Current Voltage and Caption

StartProcess

cmd /k wmic cpu get caption,currentvoltage

----------------------------------------------------------------

Caption

System Information Tool

StartProcess

msinfo32

----------------------------------------------------------------

Caption

Current Clock Speed

StartProcess

wmic cpu get CurrentClockSpeed,MaxClockSpeed /every:3

----------------------------------------------------------------

Caption

Memory Card Information

StartProcess

cmd /k wmic memorychip get FormFactor,serialnumber,partnumber,speed,capacity,name

----------------------------------------------------------------

Caption

BIOS Information

StartProcess

cmd /k wmic bios get name,version,serialnumber

----------------------------------------------------------------

Caption

BaseBoard Information

StartProcess

cmd /k wmic baseboard get manufacturer,serialnumber

----------------------------------------------------------------

Caption

Get Network Card MacAddress

StartProcess

cmd /k wmic nic get macaddress,description,speed

----------------------------------------------------------------

Caption

CDROM Drive Information

StartProcess

cmd /k wmic cdrom get drive,id,volumeserialnumber,manufacturer

----------------------------------------------------------------

Caption

Disk Drive Information

StartProcess

cmd /k wmic diskdrive get model,serialnumber,size

----------------------------------------------------------------

Caption

DirectX Diagnostic Tool

StartProcess

dxdiag.exe

----------------------------------------------------------------

Finally, Click the Build Now Button. Enjoy!

Friday, October 7, 2011

How to get the Current CPU Clock Speed, Computer Service Tag Number, Bios Name and Version using WMI

Computer stickers holds your computer service tag number or serial number information and if the technical support person needs to get the number as soon as possible. How will you solve the problem using only the command prompt?

Got an overheating problem and you need to check the current clock speed of your computer? Here’s a quick tip for windows built-in utility using Windows Management Instrumentation (WMI) called wmic.

Open the command prompt (Start Search –> cmd) and type the following command for BIOS Name, Service Tag Number and Version

wmic bios get name,serialnumber,version

Computer System Product information Name, Identifying Number and UUID

wmic csproduct get name,identifyingnumber,uuid

CPU Name, Current Clock Speed and Maximum Clock Speed

wmic cpu get name,CurrentClockSpeed,MaxClockSpeed

You can monitor the changes in CPU clock speed every Seconds

e.g. 3 seconds

wmic cpu get name,CurrentClockSpeed,MaxClockSpeed /every:3


Thanks for reading the article!

Thursday, October 6, 2011

Using Subst command to create virtual drives

Subst is being use to associate or substitutes folders as virtual drives. The command lets you access data easily and By functionality, its almost the same as creating folders to computer window.

Lets try using the command by creating drive S: using the folder c:\files.

type “cmd” at Start search, and follow the command below

commandprompt

s: – virtual drive letter

files – folder that you want to associate (c:\files)

localdisk

Afterwards, you’ll see the virtual drive instantly. Anyway, the problem with the command, when the computer restarts, all created virtual drives will be deleted automatically.

So, Let’s solve and try loading the commands before logging into windows.

Open your Notepad and write the command

subst s: c:\myfiles\videos
subst x: c:\backup

Use File > Save As and go to the following folder location

C:\Users\[username]\AppData\Roaming\Microsoft\Windows\Start Menu\Programs\Startup

Make sure that you Click ALL Files (*.*) and write the filename

subst_batchfile

Great?!

To delete any virtual drive use the command SUBST Drive /d

e.g. Subst s: /d

Usage

C:\Users\mstouch>subst /?
Associates a path with a drive letter.

SUBST [drive1: [drive2:]path]

SUBST drive1: /D

drive1: Specifies a virtual drive to which you want to assign a path.

[drive2:]path 

Specifies a physical drive and path you want to assign to a virtual drive.

  /D             Deletes a substituted (virtual) drive.

Type SUBST with no parameters to display a list of current virtual drives.

C:\Users\mstouch>

Thanks for reading the article!

Sunday, October 2, 2011

How to Remove items at most recently used lists for Run Window

runmrurunmru_edit

If your computer are shared by your family, privacy sometimes are very important - editing history list from your run window is a very cool topic.

Here’s how…

Open your registry editor, press Win + R and type “regedit”

and go to the folder below

HKEY_CURRENT_USER\Software\Microsoft\Windows\CurrentVersion\Explorer\RunMRU

Look for the item that you want to remove from the list and delete

edit

Most of the data in the registry are now secured for the newer version of windows, so, editing and adding data are safe as long as any changes came from the source you trust.

Thanks for reading the article!

Friday, September 2, 2011

How to increase USB storage performance

This is a new update for Windows 7 and Windows Server to boost the speed of USB storage devices by increasing the maximum transfer size. After installing the update, you can change the maximum transfer size from 64 kilobytes (KB) up to 2 megabytes (MB) using your windows registry editor.

The hotfix is only available to the following operating systems:

  • Windows 7 and above
  • Windows 7 Service Pack 1 (SP1) and above
  • Windows Server 2008 R2
  • Windows Server 2008 R2 Service Pack 1 (SP1) and above

After installing the update here’s the Registry Hack to increase the maximum transfer length:

1. Click the Start Menu > type “regedit” in the Start Search

2. Once the registry editor is open, go to the following registry folder

HKEY_LOCAL_MACHINE\SYSTEM\CurrentControlSet\Control\usbstor\VVVVPPPP

3. Right-click any vacant space > New > DWORD (32-bit) Value

4. Type MaximumTransferLength and double-click to modify the value data

5. Select Decimal and type a value between 65535 and 2097120 (64k to 2M) e.g. 2000000

Using Regdevelop to create registry application to increase the maximum transfer size of USB devices

maxtransfersize

Drag the Checkbox control and start configuring the program using the settings below

Caption

Maximize the USB Transfer size

RegKeyPath1

HKEY_LOCAL_MACHINE\SYSTEM\CurrentControlSet\Control\usbstor\VVVVPPPP

Value_Name1

MaximumTransferLength

ValueData1

2000000

ValueType1

DWORD

Thanks for reading the tip!

Sunday, August 21, 2011

Save more space by Removing Windows Service Pack Folders

After installing service pack, Windows automatically creates a backup of the files and settings that service pack installer changes, some are very important if system files is corrupted or damaged, you can use the contents of the folder to return your computer to its previous state.

uninstall

C:\windows\$NtServicePackUninstall$ Folder – This folder is safe to delete unless you want to restore windows without service pack in the future.

service

C:\windows\SevicePackfiles Folder – This folder contains files that are required to replace damaged or changed protected system files, this is not recommended to delete unless you installed softwares that automatically restore to original state after reboot e.g. DeepFreeze

Windows Vista SP1 and SP2 File Cleanup Tool

compcln.exe helps to recover permanent hard disk space by removing previous version of RTM and SP1 files.

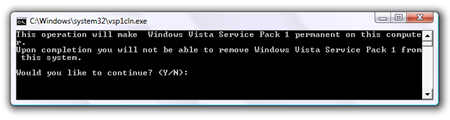
For Vista SP1 Files, use vsp1cln.exe to save more space.

Windows 7 Disk Cleanup Tool

Installing Windows 7 SP1 will require a bit more hard drive space, simply by using Windows 7’s built-in Disk Cleanup Tool will do the job easily or use the Deployment Image Servicing and Management (DISM) Tool.

DISM.exe /online /cleanup-image /spsuperseded

Quick Tip: Easily Play .Webm formats

Webm is an audio video format use in Youtube design to provide royalty free and open video compression design for HTML5. Youtube offers WebM videos in 480p and 720p format so, if you encountered some files with .webm extension, here’s a quick tip.

Simply drag and drop the file to your Google Chrome browser

googlechrome 

Easy?!

If your using http://windowsforus.com/youtube to browse and save videos at youtube, parsing those links many times, for sure, you’ll encoutered this type of video.