Thursday, March 31, 2011

How to Install IIS (Internet Information Services) in Windows Server

initialconfigtask

Windows Server is the leader in terms of operating system unit and revenues. According to Wikipedia, Internet Information Server is a Web Server application on the Internet created by Microsoft for use with Windows. It is the most used Web server after Apache HTTP Server.

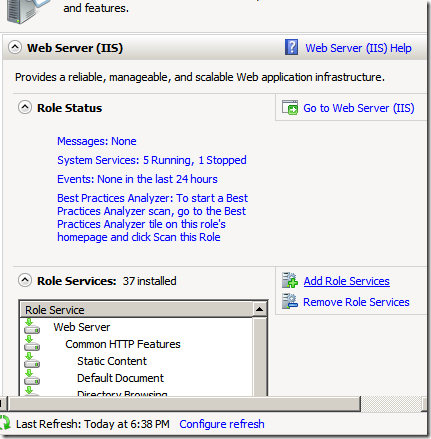
It provides a reliable, manageable, and scalable Web application application infrastructure.

IIS is not turned on by default when Windows is installed.

How to activate the Internet Information Services

Once the Initial configuration Task Window is ready, go to the Add roles option.

addrole 

If not loaded, you can access this using the Server Manager window

servermanager

Select to check the “Web Server (IIS)” option and follow the Wizard instruction.

webserver

It’s really fast and easy!

finished

Once the Web Server Installation is finished and you want to add more features, go to the “Add Role Services”

editaddfeatures_services

and Select the Role Services that you want to add e.g. CGI

editaddfeatures

Click the Install option.

install

That’s it!

Sunday, March 27, 2011

Network Folder Not Available in Browse for Folder Window

networksharedfolders 

Alright, I encountered this problem when installing SQL using Web Developer Express edition and I’m going to have some quick solution to the problem using the command interpreter.

There has been some problem in your user-rights, probably not yet configured in the computer you are connecting to, your Windows 7 network automatically use the IP version 6 configuration and IPv4 has wrong 32-bit integer value.

notavailable 

Go to your run Window (Win+R) and launch the command interpreter (cmd.exe)

Once the tool is open (cmd.exe), use the command

net use {drive} \\{computer name or IP address}\{shared folder}

Here’s an example below where the driver letter is y:, the computer name is vistauser-pc and the shared folder is Q.

netuseq3

Now, you can browse the network folder.

available

If you can’t still see the folder, you can type the path manually as shown above.

Thanks for reading this article!

Sunday, March 6, 2011

Have Fun Learning CSS

Cascading Style Sheets (CSS) is a style sheet language designed for the look and formatting of web pages written in HTML.

Sample design


Cool right?

I’ve been busy learning several introductory topics and technologies from Asp.net, CSS, Ajax, Microsoft AJAX and Javascript for three weeks now. I already had some background for the languages designed for engineering purposes but for website design – none.

I’m going to share some of my experiences along the way.

Open your Notepad or you can use the free Visual Web Developer Express Edition and try learning CSS…


Default HTML Code

<html>
<head>

</head>
<body>

</body>
</html>

You can insert the CSS code between the <head> … </head> and <body> … </body> section

<html>
<head>

<style type="text/css">
div.im
{
margin: 3px;
border: 1px solid #000fff;
float: left;
}
div.im a:hover im {border: 3px solid #96cf23;}
</style>

</head>
<body>

</body>
</html>

The CSS code for adding border, margin and floating the images left

div.im
{
margin: 3px;
border: 1px solid #000fff;
float: left;
}

Adding a hover effect once the mouse is located on top of the image

div.im a:hover im {border: 3px solid #96cf23;}

In the <body> … </body> section, lets try using the CSS code using an image.

Default syntax for Image with specified ID, Height and Width

<img src="star.jpg" id="1" height = "90" width = "100"/>

Finalized code

<html>
<head>

<style type="text/css">
div.im
{
margin: 3px;
border: 1px solid #000fff;
float: left;
}
div.im a:hover img {border: 3px solid #96cf23;}
</style>

</head>
<body>

<div class="im"><a href="#"><img id="1" src="http://windowsforus.com/y3/star.jpg" width="110" height="90" /></a> </div>

<div class="im"><a href="#"><img id="2" src="http://windowsforus.com/y3/star.jpg" width="110" height="90" /></a> </div>

<div class="im"><a href="#"><img id="3" src="http://windowsforus.com/y3/star.jpg" width="110" height="90" /></a> </div>

<br clear="all" />

</body>
</html>

Thanks for reading the article!

Saturday, February 12, 2011

Quickly Get PC Information using WinGuggle 2.3

icon Making sure that you have a list of serial keys of your computers at home or office is one of the things that you must do to prevent problems in the future. For example, If you've lost your product key or the sticker is already erased, your computer is full of viruses and you need to backup the basic information for your device drivers and others - this is very difficult to recover if you will just look for it at your registry.

The program provides quick way to get your Windows and Office Product key, and PC System Information.

You just need few minutes to properly save and backup. Just copy and paste the information that you need.

Sample backup using Excel

backup

System Summary Tab

systemsummary3

Alpha Version Screenshot

Program Screenshots

Basic Theme

basic

Using Standard Theme

standard

Windows 7 Aero Theme

aero

Windows XP Version (White Color Scheme)

xp32

WinGuggle 2.3  (Final version)

  • Refresh option was added
  • System Summary - Combination of dxdiag and msinfo32 
    functionality
  • Office Works 9 Product Key Recovery
  • Office 2010 (Home, Student, Business and Professional) Serial Key Recovery
  • Windows Registry Redirection code is now fully functional
  • Bug fixes for Windows 7 - 32 and 64 bit version, Vista and XP

Download Here 

Other
Tab appearance flattens if Color Scheme changed
Different appearance for Windows XP version

For Windows XP Users

If error occurs, you need to download or add any of the version of .Net Framework

.Net Framework 3.0
http://download.microsoft.com/download/3/F/0/3F0A922C-F239-4B9B-9CB0-DF53621C57D9/dotnetfx3.exe

.Net Framework 2.0
http://download.microsoft.com/download/5/6/7/567758a3-759e-473e-bf8f-52154438565a/dotnetfx.exe

Transparency for the Updates

Quality Assurance (QA) as of February 9, 2011

winguggle23

Problem and Solutions Initial Actions
     
logical disk for 64-bit version feature remove by Microsoft detection added
compile separate version for 64-bit version test several times compiled new and tested
Registry redirection write and update code updated and tested
Office Works Product Key Recovery new feature code added
User rights while launching the program code update done
Cannot find Video Codec option - XP code update code updated and tested
Revision of Icons for Windows XP System Summary find new icons and update the code skipped for version 3
Hardware and Video Codec Icon for Windows 7 32bit fix  
recompile and test the updated 64-bit code   done
office 2003 in 64 bit version for checking registry redirection code   checked

Target Release Date: Feb 13, 2011

Thank you and Stay tuned for more softwares!

Monday, January 3, 2011

Show/Hide Internet Explorer Download Complete Window

 showhide

After downloading a file, you need to open the folder location or the file itself then suddenly, the download complete notification window did not show up…

This is a quick tip that enables the user to take control of some of the small things especially in Internet Explorer.

go to the Tools – Internet Options

toolsoption

Advance Tab - Browsing Group

downloadwindow

To turn on the feature > Click to Check “Notify when downloads complete” option

Enable the Download Notification feature using the Registry Editor

Open your Registry Editor (regedit.exe) and go to the registry path

HKEY_CURRENT_USER\Software\Microsoft\Internet Explorer\Main

notifydownloadcomplete

Locate the value name NotifyDownloadComplete and if the value is "no” it means to enable the notification feature, you need to have a value of “yes”.

Happy New Year and thanks a lot for reading the article!

Thursday, December 16, 2010

Windows Update Registry Hacks

Updates are additions to software that can prevent or fix problems in the future, enhance security, improve the computer performance and stability. It is free of charge as part of maintenance and support services for your Windows computer.
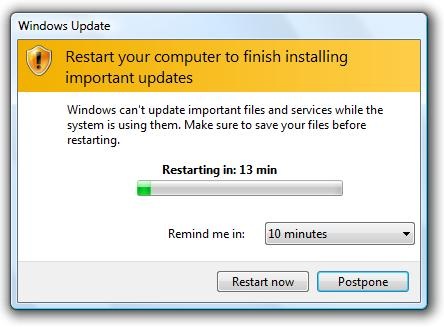
winupdate

Remove or Disable Windows Update through Start Menu Power Button and Shutdown Dialog Window

Get annoyed with  Windows update changing the sleep/shutdown to “Install Updates and Shutdown”?

shutdownhp

shutdownvista

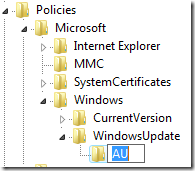
Stop Windows Update from hijacking your computer! Open your Registry Editor (regedit.exe) and go to this registry location 

 HKEY_CURRENT_USER\Software\Policies\Microsoft
registryl3


If you can’t find Windows\WindowsUpdate\AU Registry Keys, create one by using the Right-Click portion of your Mouse > New > Key Sub-menu


Removing the Windows Update as Default Option 

createdword3

Create New Registry Value name NoAUAsDefaultShutdownOption with a value of 1

Windows XP Results

noauasdefault1

Windows Vista and 7…

noauasdefaultstartmenu

If you want to get rid of the entire option, create a registry dword value name NoAUShutdownOption with a value of 1

NoAUShutdownoption

Disable Force Auto Update Reboot while Logged On

Is Windows Update restarting your system unexpectively? Create a registry dword value name NoAutoRebootWithLoggedOnUsers with a value of 1

Prohibits Windows from searching for updates

Registry Location

HKEY_LOCAL_MACHINE\SOFTWARE\Policies\Microsoft\Windows\WindowsUpdate\AU

Create a registry value name NoAutoUpdate with a value of 1

Result

checkforupdates

Automatic Windows Update Search is Enabled
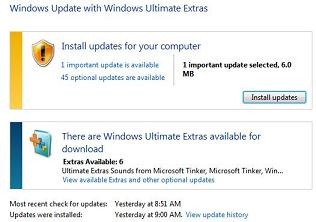
autoupdate_chrink

Allow Automatic Updates immediate installation

“Automatic installation of certain updates that neither interrupt Windows services nor restart Windows”

Create a registry name AutoInstallMinorUpdates with value of 1 to silently install minor updates.

Note

You can remove some updates, but not updates that affect important operating system files. You should only remove an update if you’re sure that it’s causing the problem through Add or Remove Programs (XP) and Program and Features (newer version of Windows).

That’s it! Hope this tip saves you a lot of time for fixing your computer problems…

Source(s)

MS Windows Server 2003 SP2 Policies

http://WindowsForUs.com?technetmsdnau
Sunday, December 12, 2010

Cheap CD-ROM Audio System in your Workplace

With good work place design, especially if your working at home, you can create stations at work where people will be productive, innovative and happy.

design


This is one of the things that I’m studying for the past few weeks. Designing my workstation for all kinds of people.

The thing is, you can’t work and stay at the same position the whole day. Sometimes, even if you don’t want to, you need to go outside or sometimes relax.

The truth is, I already put the system in my small computer shop business and it works flawlessly with all kinds of people the whole day. wow!!!

Here’s what you need:

  • Old ATX Power Supply or any as long as it has 5v and 12v power output - find some junk PC at home and remove the power supply or just buy one around 6-9 dollars
  • Old CD-ROM Drives with Play and Stop (as many as you can - in my case 3-CDROM cost $2 each)

 schematic

Simply Plug the power supply > connect the Computer Speaker to Headphone input > put your Audio CDs and push the Play Button

That’s it! Nice and Easy way of creating your own CD-ROM Audio System Station.

Have a great day!